|
 |
|
 |
|
| Author |
Message |
SKIN JOB 66
Community Member

Joined: 16 Jan 2008
Posts: 2724
Location: FRANCE
|
 Posted: Tue May 10, 2016 2:10 pm Post subject: Posted: Tue May 10, 2016 2:10 pm Post subject: |
 |
|
IN AWE ONCE AGAIN !
I can understand why you'll need a break after completion of this project Colin, pfew what a ride... but really worth it, at least from my fan of your work POV.
As Phil and JB previously underscored, this is an impressive build, a true masterpiece in itself... and the best is yet to come with the final touch : The painting and weathering of the piece promise to be epic, I personally can't wait to see that !
Fred
_________________
THE FUTURE IS A THING OF THE PAST |
|
| Back to top |
|
|
|
|
 |
|
 |
|
|
|
|
| Author |
Message |
joberg
Community Member
.jpg)
Joined: 06 Oct 2008
Posts: 9447
|
| Posted: Tue May 10, 2016 6:46 pm Post subject: |
|
|
Yep, understood Colin; some project are just sucking all of our energy  |
|
| Back to top |
|
|
|
|
|
|
|
|
|
|
|
| Author |
Message |
8th_Passenger
Community Member

Joined: 28 Nov 2009
Posts: 443
Location: Hertfordshire, UK
|
| Posted: Sat May 14, 2016 6:18 pm Post subject: |
|
|
I'm getting really close to finishing now.
A few things have cropped up during the final assembly that I thought were worth covering in an update.
Also there are still some aspects of the fabrication to cover.
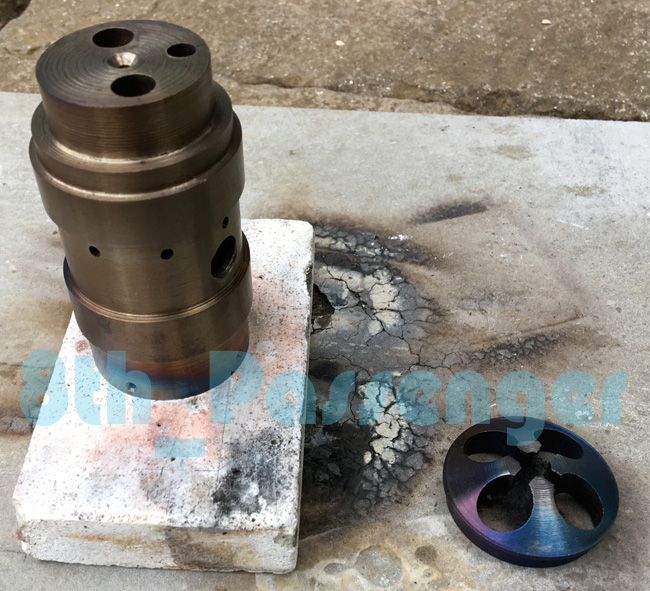
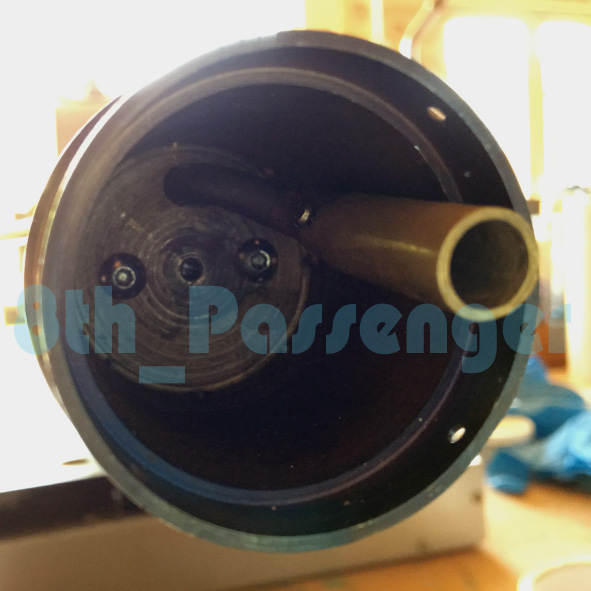
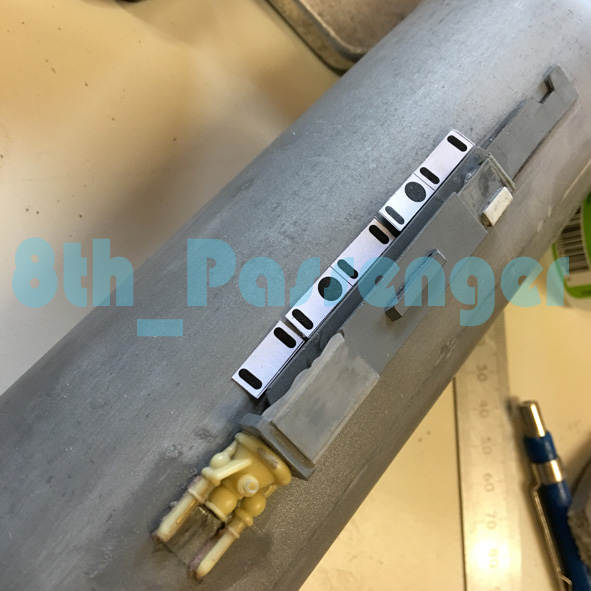
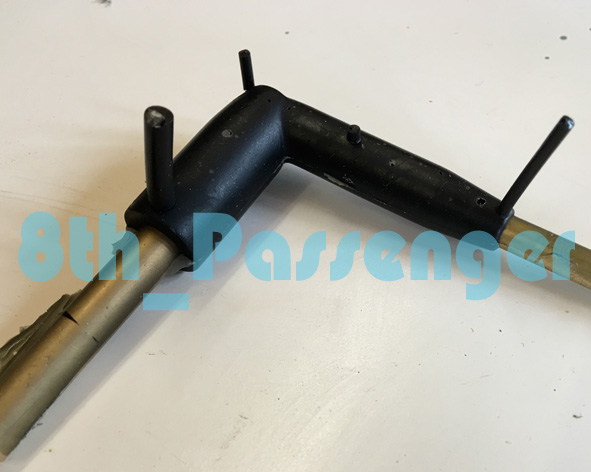
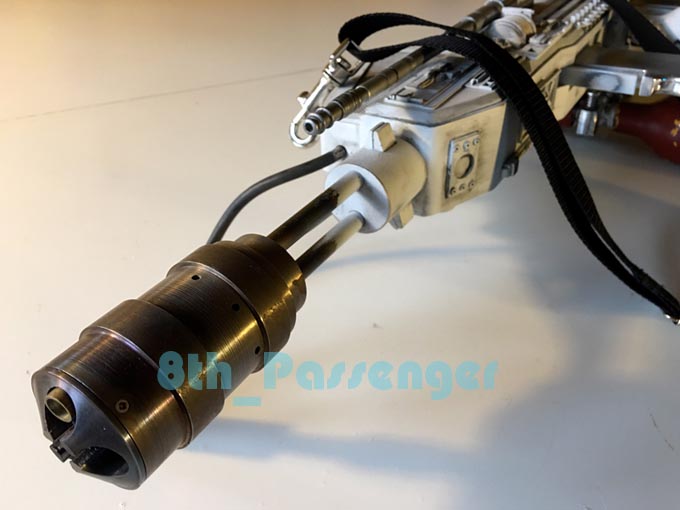
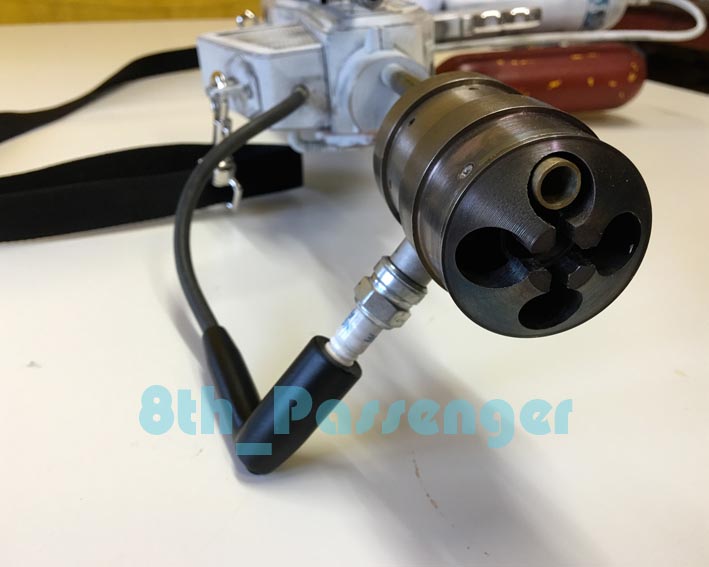
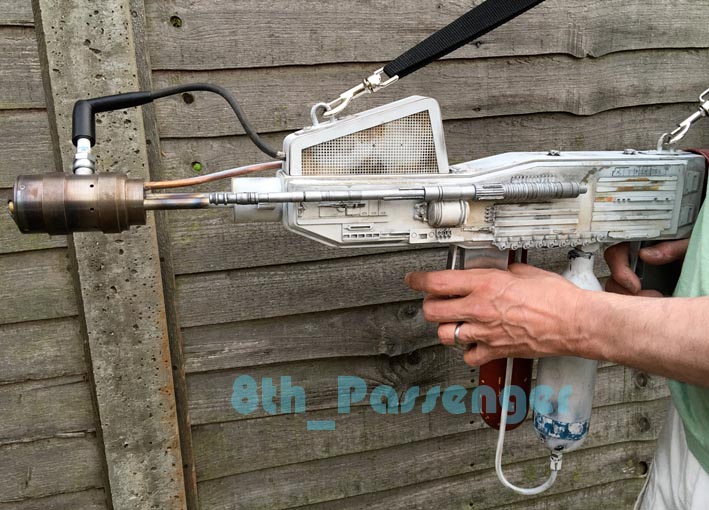
I heat treated the emitter to give it some colour.
I bent the feed pipe for the pilot flame.
There is not really enough room to get the bends I needed. I wish I had bored out the emitter a bit deeper.
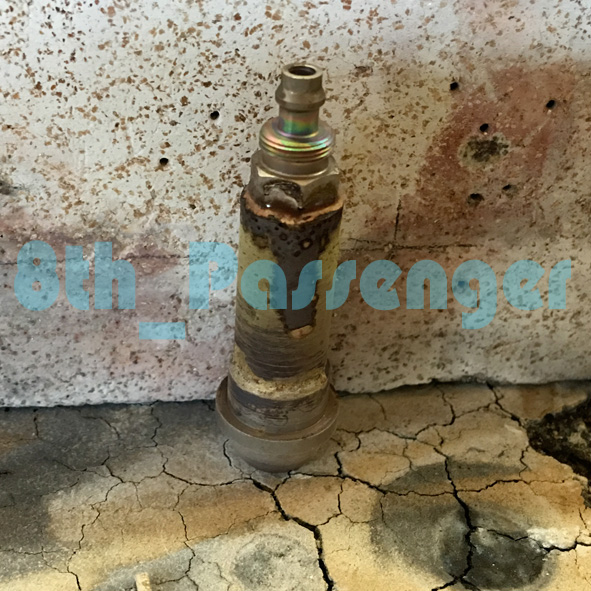
I used a bit of steel pipe to help bend it after annealing the copper tube.
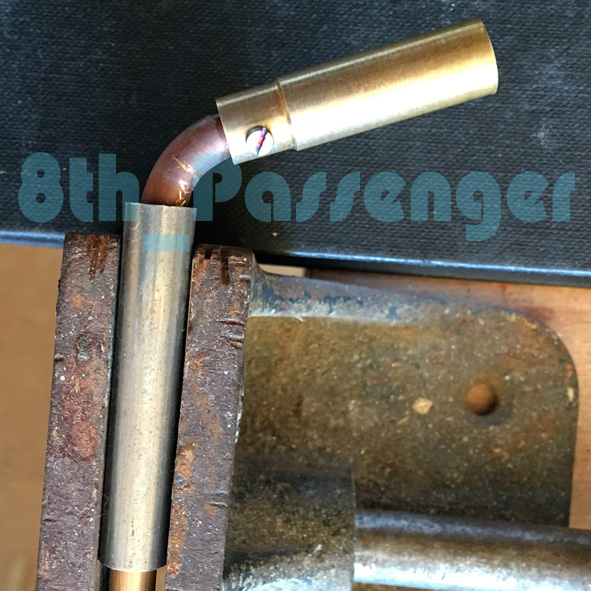
It took me two attempts as I realized I'd cut my original copper pipe too short.
These are the first two bends.
It didn't quite work out like this!
But I got it to bend in the right places in the end.
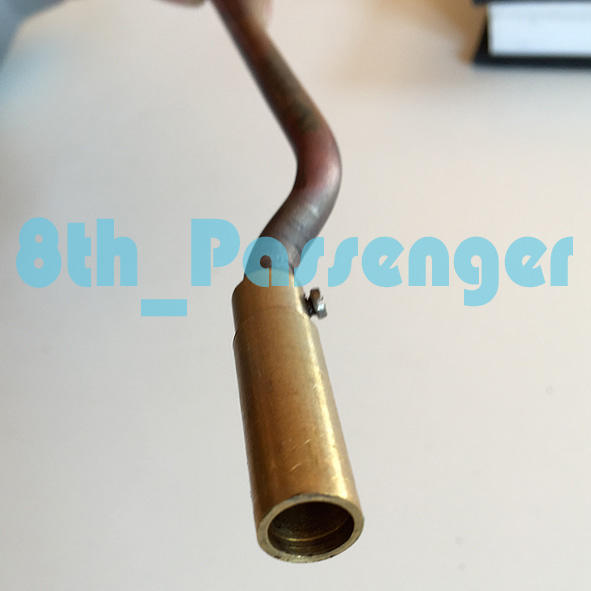
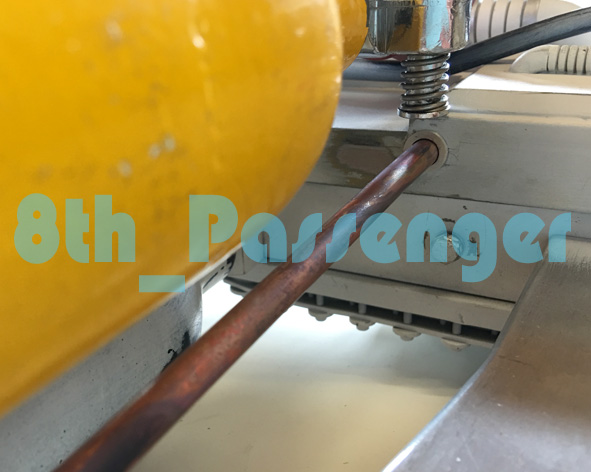
I had to re-drill and tap the end of the copper pipe whist in position on the unit. Because it was now bent I couldn't remove it.
Also I realised, when test fitting it, I would have to solder it in position to stop it unscrewing when connecting the neoprene feed (Its soldered on the actual units).
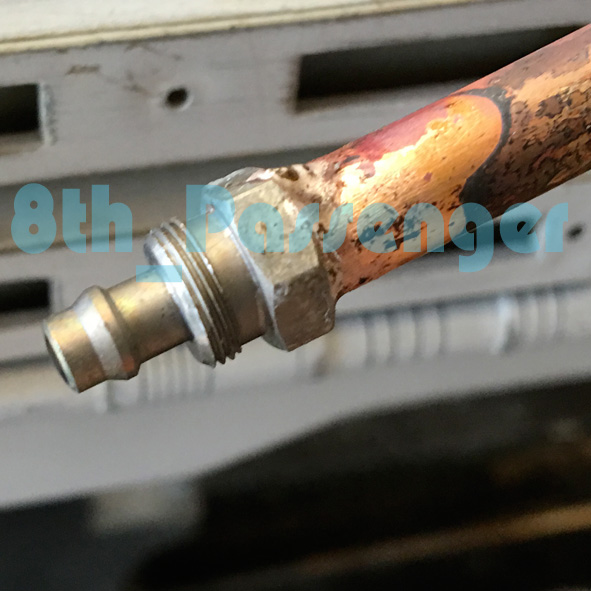
I thought I should solder the fitting at the other end too.
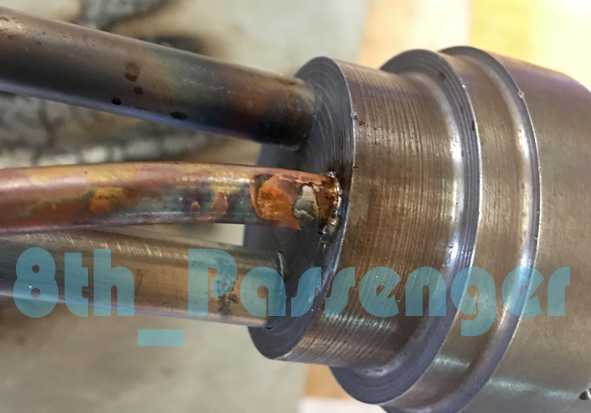
I soft soldered the copper tube where it enters the rear of the emitter to stop it slipping backwards or forwards.
Apart from the spark plug cap I still have to make one more thing which are some extra details for the white tank. They go here. I hope to get them laser cut this week.
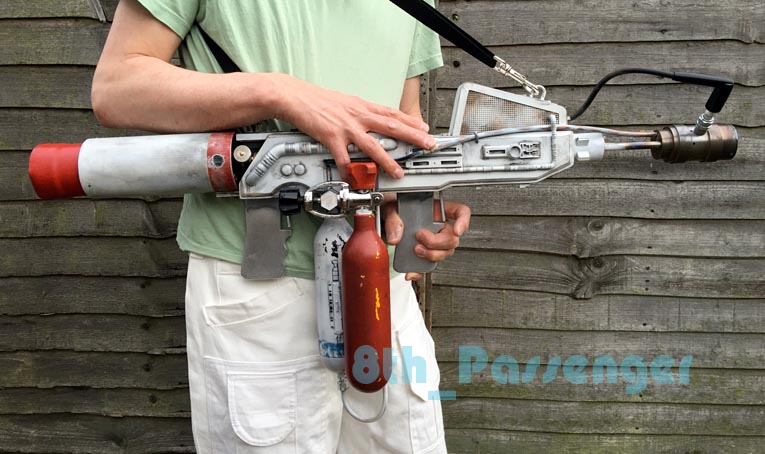
I toyed with the idea of fitting a back panel in the body to help support the valve.
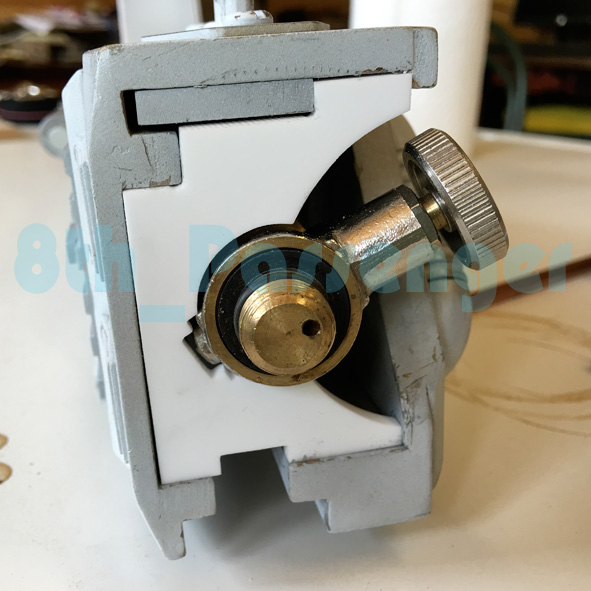
It made the connection to the propane bottle more difficult. I thought it might help secure the propane tank in it's tube!
But I went for another idea which was to put three grub screws at the end of the tube to lock and center the bottle.
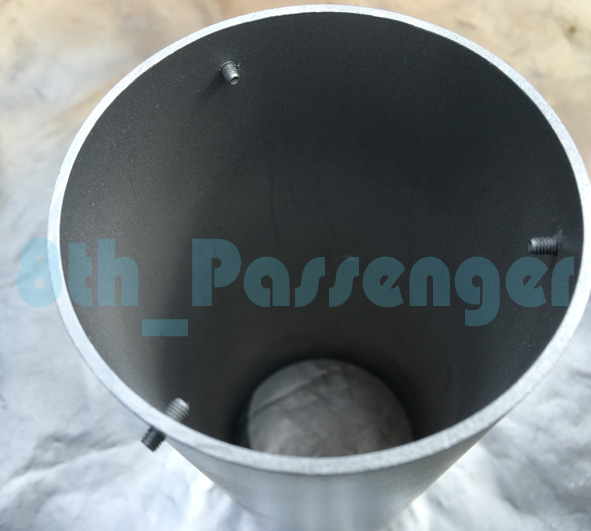
I think some shorter grub screws may be in order.
I don't think a fixing like this appeared on the original units. It looks like they used white Gaffer tape to hold the bottle in place. I'm still undecided if I want to apply the tape.
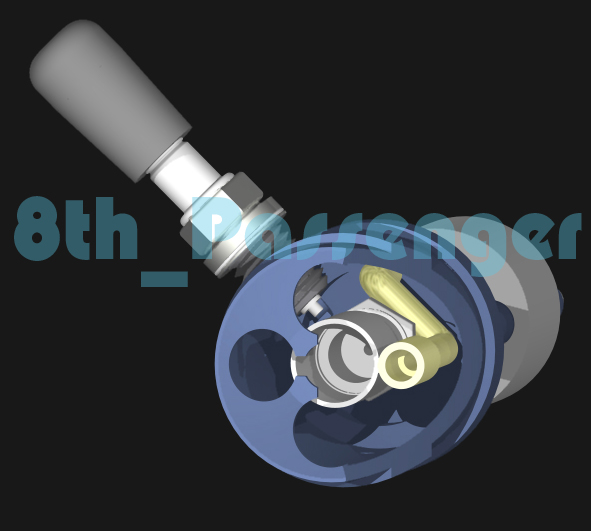
Whilst gluing the detail on the white tank today I noticed I had a decision to make.
Where did I want the 'tank detail' to lie when the tank was screwed fully in position.
Here it lies at the back
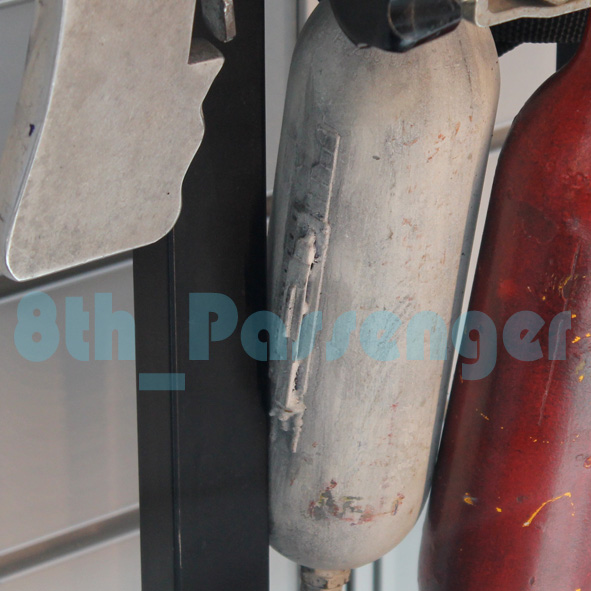
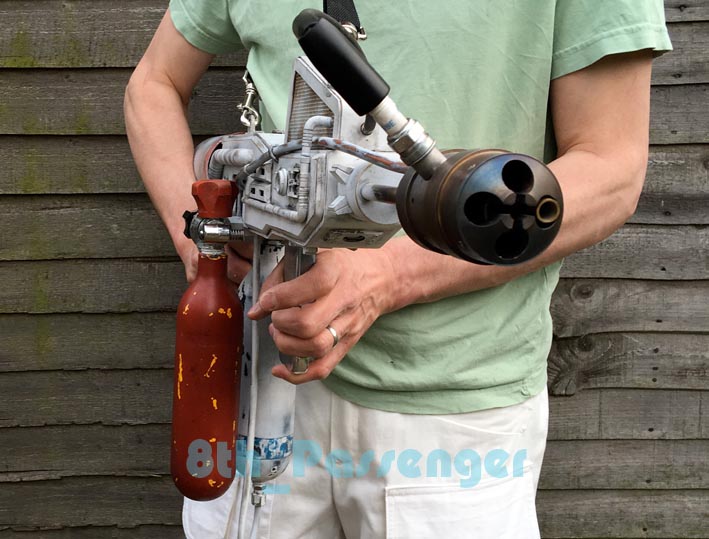
Here it faces out from the left side.
I decided this probably wasn't the best position for it as it may get broken off being against the body.

So I've opted for this position.
.jpg)
Hopefully I'm still on track for finishing at the end of the month!
Painting is going reasonably well.
Colin
_________________
Ripley: What's it key on?
Ash: Micro changes in air density. |
|
| Back to top |
|
|
|
|
|
|
|
|
|
|
|
| Author |
Message |
joberg
Community Member
Joined: 06 Oct 2008
Posts: 9447
|
| Posted: Sun May 15, 2016 3:27 pm Post subject: |
|
|
Keep on truckin' Colin! Yep, that detail on the tank will defo look better on the side. Cannot wait for the paint job to be finished  |
|
| Back to top |
|
|
|
|
|
|
|
|
|
|
|
| Author |
Message |
Harry Harris
Community Member

Joined: 23 Aug 2006
Posts: 56
Location: United Kingdom
|
| Posted: Mon May 16, 2016 4:35 pm Post subject: |
|
|
Good lord this is a thing of beauty!
Harry
_________________
 |
|
| Back to top |
|
|
|
|
|
|
|
|
|
|
|
| Author |
Message |
SKIN JOB 66
Community Member
Joined: 16 Jan 2008
Posts: 2724
Location: FRANCE
|
| Posted: Tue May 17, 2016 2:00 am Post subject: |
|
|
Great work once again Colin !!!
Fred
_________________
THE FUTURE IS A THING OF THE PAST |
|
| Back to top |
|
|
|
|
|
|
|
|
|
|
|
| Author |
Message |
8th_Passenger
Community Member
Joined: 28 Nov 2009
Posts: 443
Location: Hertfordshire, UK
|
| Posted: Sun May 22, 2016 4:27 am Post subject: |
|
|
Thank-you Harry and Fred for your comments.
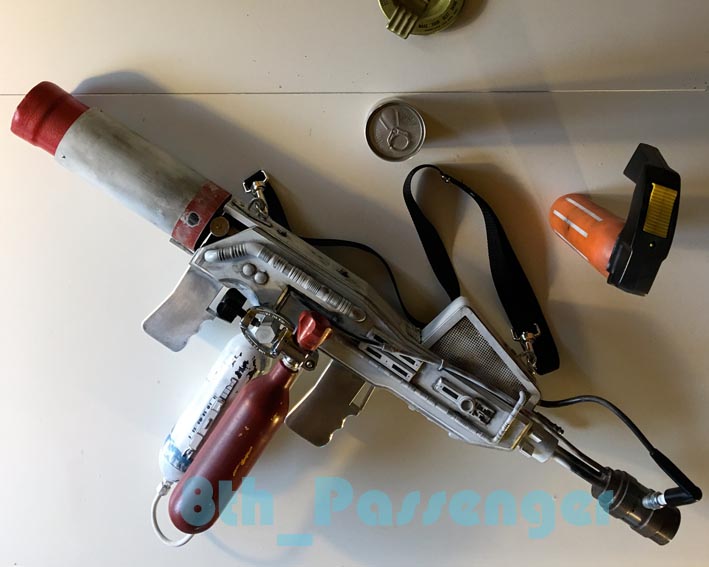
Okay time for the final pieces of the jigsaw puzzle!
I got the missing detail parts for the white tank laser cut.
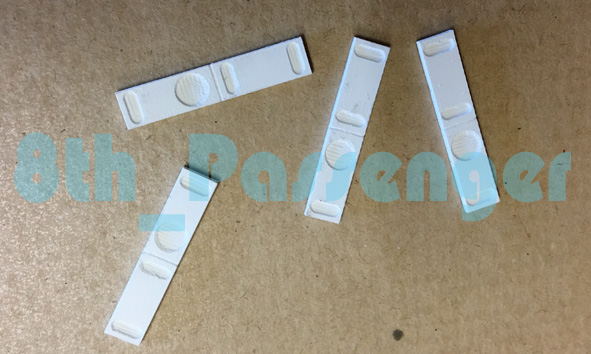
Now I just have to fit them.
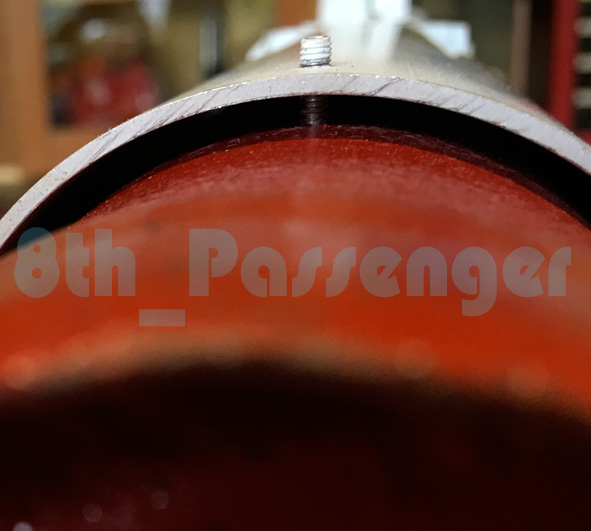
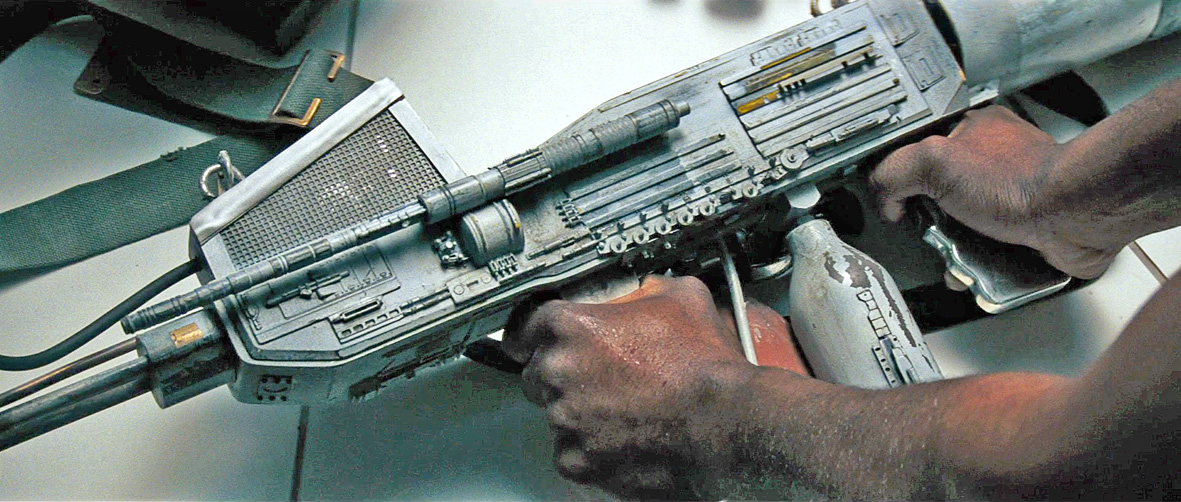
The rear tube on the actual flamethrower is steel and is welded onto the steel grip frame. I guess this is to protect the propane bottle and valve connection during use.
Because the rear tube on mine is aluminum I have had to do a mechanical fixing.
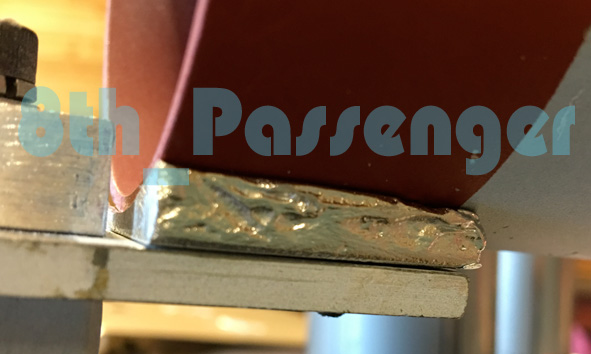
So I had to create a mock weld/wedge to take up the gaps at either side of the tube where it joins the grip frame.
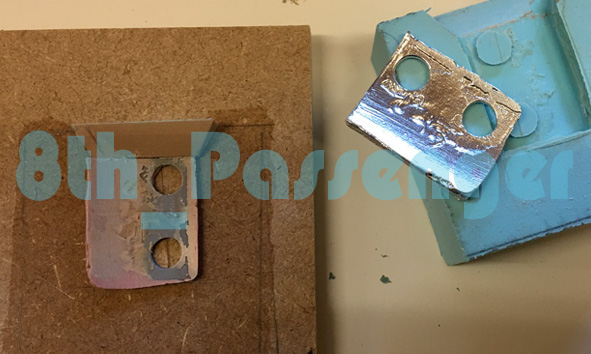
I made this by using some filler on a base of styrene. I then moulded it and cast it in white metal, to give it some strength.
I moulded my spark plug cap in silicone in the end. Mainly because it was quicker and a fact-cast one would be okay for the photographs.
.jpg)
But I also managed to get hold of some urethane rubber so I cast one up in that too.
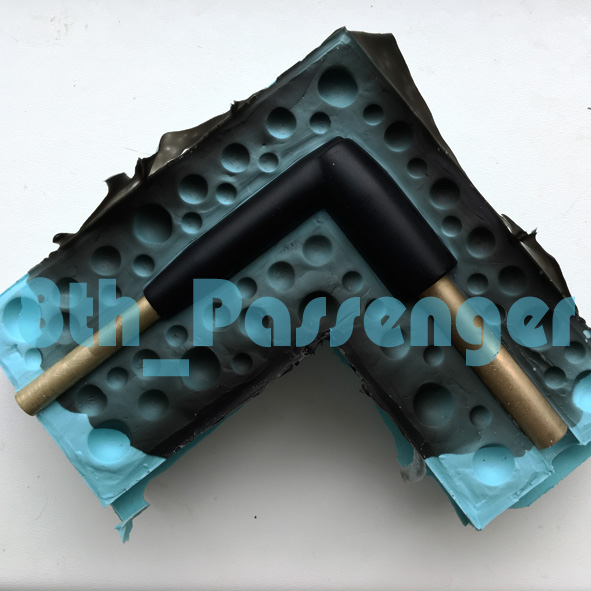
Its probably not as ridged as a vulcanized rubber but it wont snap off like the fast cast one if it gets knocked.
A few air bubbles but not a bad first attempt.
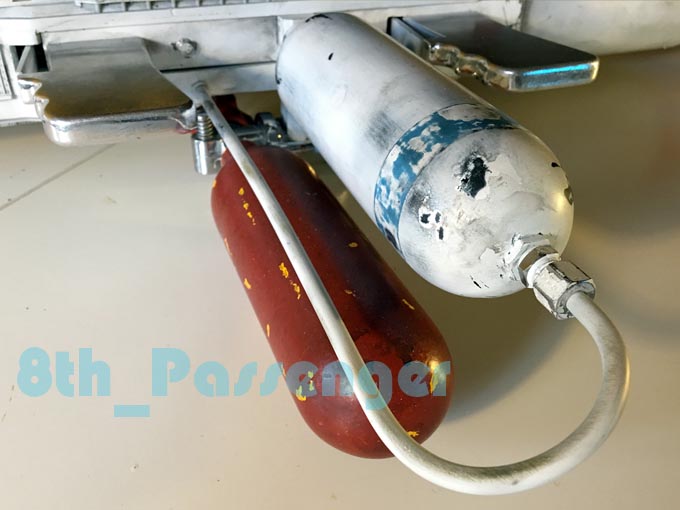
I decided the entry hole for the feed from the bottom of the white tank should be in the underside of the body rather than connecting to the yoke on the red bottle.
I drilled a hole and turned a little insert for the tube to locate into.
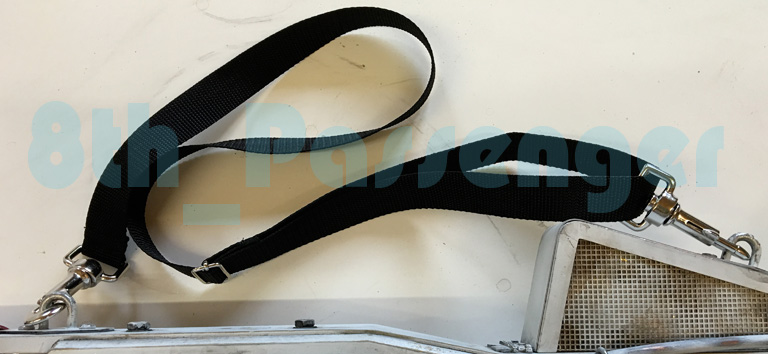
I hand stitched the fittings I got to make up the sling. I went for 25mm black webbbing but 38mm may have been more comfortable. I think I can improve on this later.
As the whole unit weighs 17 pound or so a leather strap my be more hard wearing!
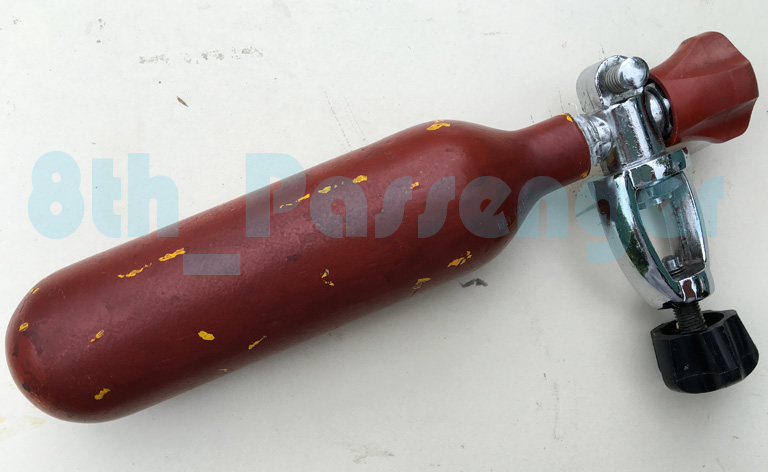
I finally put a coat of paint on the pony tank.
Colin
_________________
Ripley: What's it key on?
Ash: Micro changes in air density. |
|
| Back to top |
|
|
|
|
|
|
|
|
|
|
|
| Author |
Message |
8th_Passenger
Community Member
Joined: 28 Nov 2009
Posts: 443
Location: Hertfordshire, UK
|
| Posted: Sun May 22, 2016 10:45 am Post subject: |
|
|
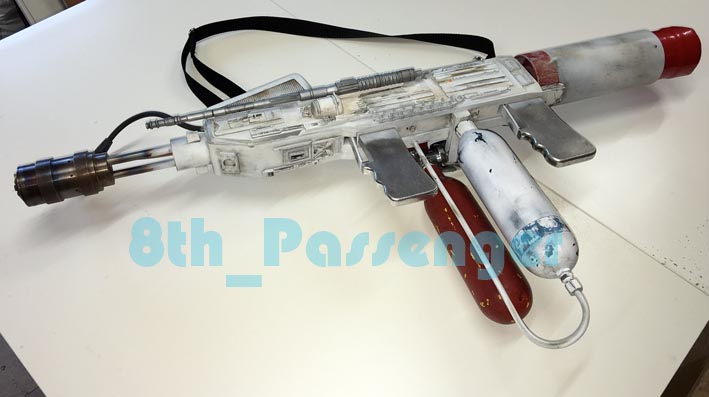
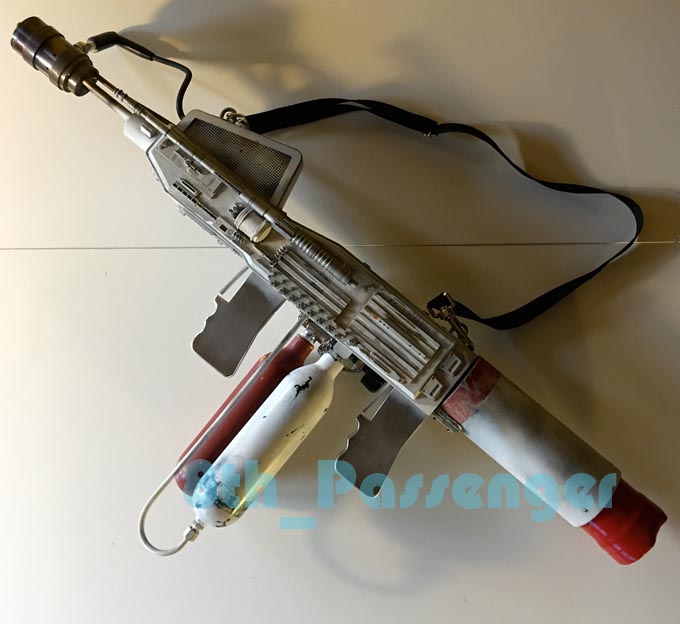
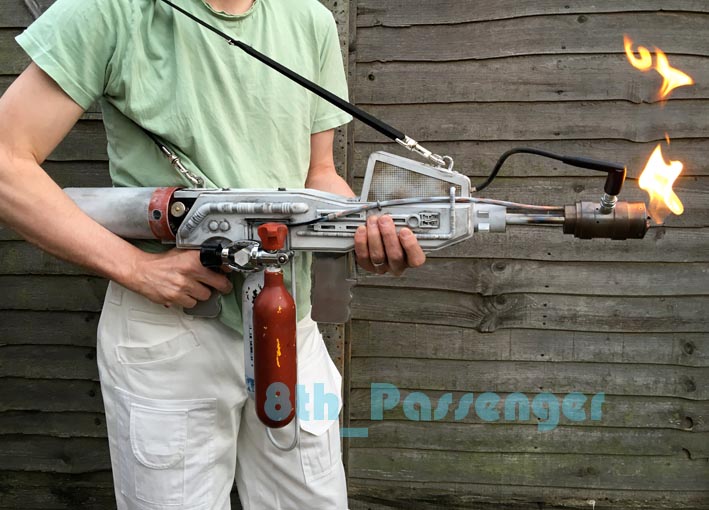
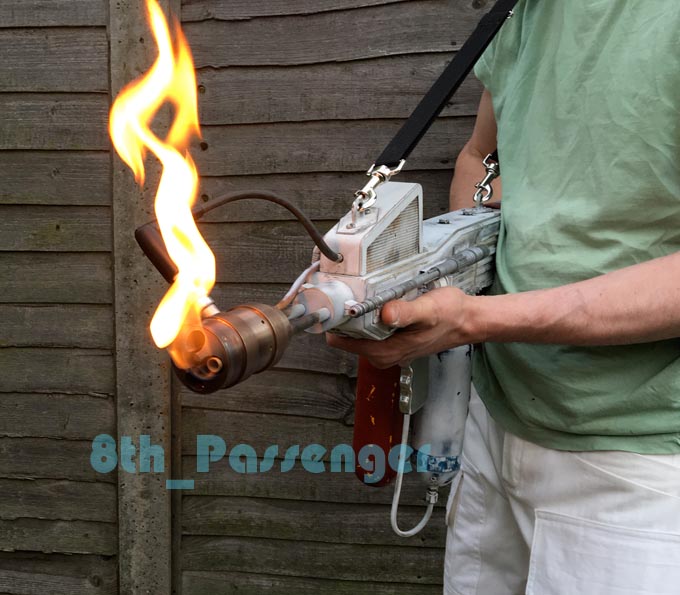
Finished (finally!) 
At some point I hope to take some better photographs in a more Nostromo like interior.
But for now two Ikea tables and a garden fence will have to do....
Colin
_________________
Ripley: What's it key on?
Ash: Micro changes in air density. |
|
| Back to top |
|
|
|
|
|
|
|
|
|
|
|
| Author |
Message |
Buch
Community Member

Joined: 27 Feb 2014
Posts: 1184
Location: Copenhagen, Denmark
|
| Posted: Sun May 22, 2016 1:25 pm Post subject: |
|
|
Holy fuck! That is crazy awesome!!! WOW 
Nice job, Sir!
_________________
Monsieur, azonnal kövessen engem bitte |
|
| Back to top |
|
|
|
|
|
|
|
|
|
|
|
| Author |
Message |
veektohr
Community Member
Joined: 26 Feb 2016
Posts: 237
Location: Los Angeles
|
| Posted: Sun May 22, 2016 3:05 pm Post subject: |
|
|
| It really is just perfect. Even the flame is dead on. This is definitely up there in best prop builds of all time. |
|
| Back to top |
|
|
|
|
|
|
|
|
|
|
|
| Author |
Message |
Futurepig
Community Member

Joined: 28 Jun 2011
Posts: 54
|
| Posted: Mon May 23, 2016 12:35 am Post subject: |
|
|
It's perfect!
I salute your skills and patience.
_________________
 |
|
| Back to top |
|
|
|
|
|
|
|
|
|
|
|
| Author |
Message |
8th_Passenger
Community Member
Joined: 28 Nov 2009
Posts: 443
Location: Hertfordshire, UK
|
| Posted: Mon May 23, 2016 1:23 am Post subject: |
|
|
Buch, veektohr & Futurepig, thank you for your comments.
I'm glad you like it.
veektohr, high praise indeed, thank you again.
Colin
_________________
Ripley: What's it key on?
Ash: Micro changes in air density. |
|
| Back to top |
|
|
|
|
|
|
|
|
|
|
|
| Author |
Message |
nickdaring
Community Member

Joined: 16 Dec 2006
Posts: 261
|
| Posted: Mon May 23, 2016 3:06 am Post subject: |
|
|
Amazing work!
And my dream prop project list now grows a little bigger... |
|
| Back to top |
|
|
|
|
|
|
|
|
|
|
|
| Author |
Message |
SKIN JOB 66
Community Member
Joined: 16 Jan 2008
Posts: 2724
Location: FRANCE
|
| Posted: Mon May 23, 2016 7:02 am Post subject: |
|
|
TOTALLY BLOWN AWAY BY THE END RESULT, BRAVO COLIN !
(use it next time you'll have to start a barbecue !)
Fred
_________________
THE FUTURE IS A THING OF THE PAST |
|
| Back to top |
|
|
|
|
|
|
|
|
|
|
|
| Author |
Message |
Pro Mod
Community Member
Joined: 13 Aug 2010
Posts: 108
Location: Manchester, England
|
| Posted: Mon May 23, 2016 7:09 am Post subject: |
|
|
Fantastic work Colin and the paint job is wonderful.
Hope you had a few cans of Weylan Yutani beer to celebrate. |
|
| Back to top |
|
|
|
|
|
|
|
|
|
|
|
| Author |
Message |
joberg
Community Member
Joined: 06 Oct 2008
Posts: 9447
|
| Posted: Mon May 23, 2016 3:42 pm Post subject: |
|
|
That prop is A+ in my book: the paint job is Pro  Just noticed that the pilot flame is close to your rubber plug (better in the end for the wear & tear look)! Just noticed that the pilot flame is close to your rubber plug (better in the end for the wear & tear look)!
Love the uniform also...and the wooden fence Great job and very cool result!!! |
|
| Back to top |
|
|
|
|
|
|
|
|
|
|
|
| Author |
Message |
8th_Passenger
Community Member
Joined: 28 Nov 2009
Posts: 443
Location: Hertfordshire, UK
|
| Posted: Tue May 24, 2016 1:20 pm Post subject: |
|
|
nickdaring, ProMod, Fred and joberg, thanks for your comments.
Joberg the uniform was a token gesture. I have all the stuff I need for a full costume but it needs lots of work to make it how I want it. A project for later in the year.
The spark plug cap in the picture with the flame is painted fast cast. It almost got slightly cooked.
Colin
_________________
Ripley: What's it key on?
Ash: Micro changes in air density. |
|
| Back to top |
|
|
|
|
|
|
|
|
|
|
|
| Author |
Message |
Space Jockey
Community Member

Joined: 13 Apr 2009
Posts: 559
Location: East Tennessee
|
| Posted: Tue May 24, 2016 2:46 pm Post subject: |
|
|
This is an INCREDIBLE looking prop.
From the construction, attention to detail and finishing, superb.
And it works too, just don't fry the cat with it.
Very well done indeed. |
|
| Back to top |
|
|
|
|
|
|
|
|
|
|
|
| Author |
Message |
8th_Passenger
Community Member
Joined: 28 Nov 2009
Posts: 443
Location: Hertfordshire, UK
|
| Posted: Tue May 24, 2016 3:14 pm Post subject: |
|
|
Thank you Space Jockey.
_________________
Ripley: What's it key on?
Ash: Micro changes in air density. |
|
| Back to top |
|
|
|
|
|
|
|
|
|
|
|
| Author |
Message |
Isnochys79
Community Member
Joined: 17 Jan 2013
Posts: 121
Location: France
|
| Posted: Tue May 31, 2016 5:45 am Post subject: |
|
|
What can be said ?? It's simply PERFECT !!. Congratulations Colin for
this Masterpiece. It must be great to hold this prop and feel as a
Nostromo crew member... a surviving one of course  |
|
| Back to top |
|
|
|
|
|
|
|
|
|
|
|
|
You cannot post new topics in this forum
You cannot reply to topics in this forum
You cannot edit your posts in this forum
You cannot delete your posts in this forum
You cannot vote in polls in this forum
|
|
|
|
|
|
|
|