|
 |
|
 |
|
| Author |
Message |
joberg
Community Member
.jpg)
Joined: 06 Oct 2008
Posts: 9447
|
 Posted: Thu Apr 10, 2014 4:48 pm Post subject: 2001 Space Station WIP Posted: Thu Apr 10, 2014 4:48 pm Post subject: 2001 Space Station WIP |
 |
|
Alright gentlemen, here it is; after months of research I'll build the Space Station...not "studio scale" since there's few pictures of the actual model used in the movie (heck, even Doug Trumbull doesn't have detailed pics  ) )
Buuut, it's going to be 7 feet in circumference by 57 inches wide.
It will be fully lit.
It's going to kill me, but I'm up for the challenge.
I'm thanking DaveG for his 3-D rendering of the space station and Stargazer at www.planet3earth.co.uk for his fantastic picture of the real model.
Artistic license will be taken, since I don't have all of the details/measurements, etc...
No, I will not make a run of that model 
Some of the blueprints:
 |
|
| Back to top |
|
|
|
|
 |
|
 |
|
|
|
|
| Author |
Message |
8th_Passenger
Community Member

Joined: 28 Nov 2009
Posts: 443
Location: Hertfordshire, UK
|
| Posted: Fri Apr 11, 2014 2:55 pm Post subject: |
|
|
Go joberg.
I look forward to the build. Ties in nicely with Fred's post about the new book.
Colin |
|
| Back to top |
|
|
|
|
|
|
|
|
|
|
|
| Author |
Message |
Gaff87
Community Member

Joined: 05 Oct 2008
Posts: 1727
Location: United Kingdom
|
| Posted: Fri Apr 11, 2014 2:58 pm Post subject: |
|
|
Looking good J!
Can't wait to see more on this one.
Neil |
|
| Back to top |
|
|
|
|
|
|
|
|
|
|
|
| Author |
Message |
joberg
Community Member
Joined: 06 Oct 2008
Posts: 9447
|
| Posted: Fri Apr 11, 2014 8:38 pm Post subject: |
|
|
Thanks guys...btw, since it's on a small budget ($400) I'm going to find a way to recycle a lot of things to achieve the same kind of look.
First snag: the 12'' circumference pipes that I need for the 2 main modules.
Plastic/acrylic/Syntra is very expensive these days, sooo I bought 4 white pails that I cut into 4 different pieces.
2 pieces will be parts of the landing bays and the remnants will be the 2 main modules. I also bought the spokes.
Enough blah blah...pics:
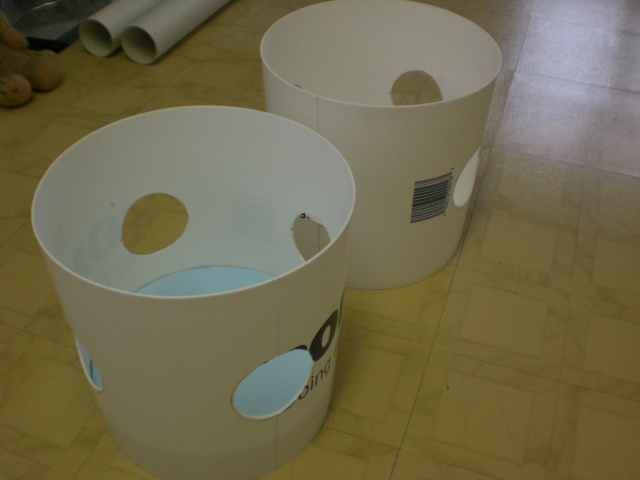
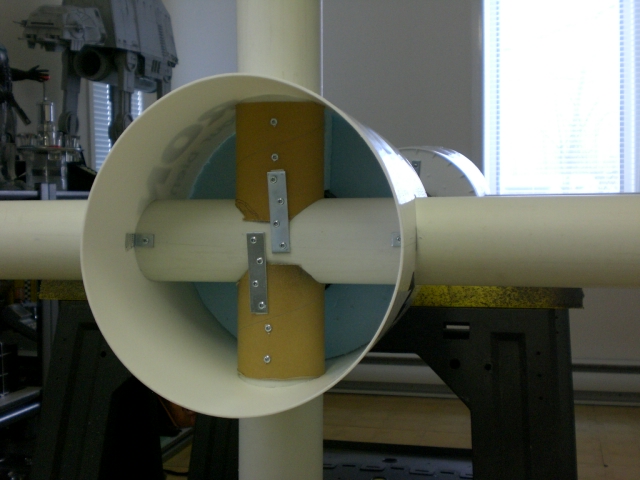
As you can see, I also cut the holes for the spokes that will hold the outer rim.
Then, I affixed the main tunnel joining the 2 main modules together and fitted the first spoke.
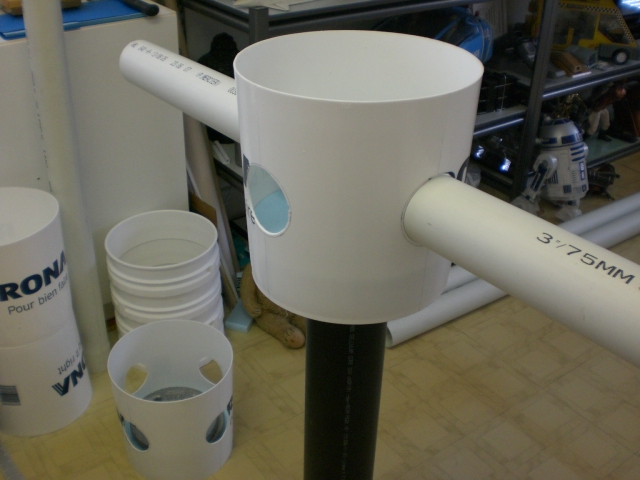
That's it for today folks...so far so good. |
|
| Back to top |
|
|
|
|
|
|
|
|
|
|
|
| Author |
Message |
Pro Mod
Community Member
Joined: 13 Aug 2010
Posts: 108
Location: Manchester, England
|
| Posted: Sat Apr 12, 2014 2:48 am Post subject: |
|
|
I think at the scale you've chosen there's real opportunity to capture the true essence of the studio original, something not normally achievable in desk top size models.
I’ll be watching this every step of the way. |
|
| Back to top |
|
|
|
|
|
|
|
|
|
|
|
| Author |
Message |
Jens2133
Community Member

Joined: 21 Aug 2011
Posts: 145
|
| Posted: Sat Apr 12, 2014 3:47 am Post subject: |
|
|
| This is exciting! A bigature! I can hardly wait for more! |
|
| Back to top |
|
|
|
|
|
|
|
|
|
|
|
| Author |
Message |
Mr Webber
Community Member

Joined: 13 Apr 2008
Posts: 1824
Location: Terra Australis
|
| Posted: Sat Apr 12, 2014 4:23 am Post subject: |
|
|
Brilliant 
_________________
Formerly offworld66 |
|
| Back to top |
|
|
|
|
|
|
|
|
|
|
|
| Author |
Message |
joberg
Community Member
Joined: 06 Oct 2008
Posts: 9447
|
| Posted: Sat Apr 12, 2014 7:54 pm Post subject: |
|
|
Thanks for the encouragements guys 
Now, I put the whole thing together and the wife went ballistic (she couldn't visualize 7 feet by 57inches )
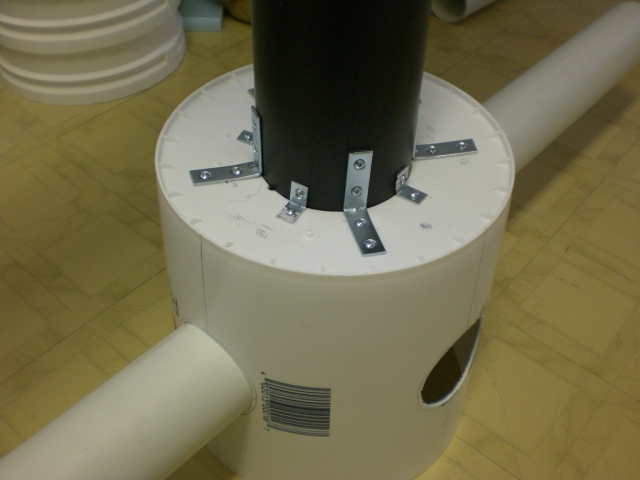
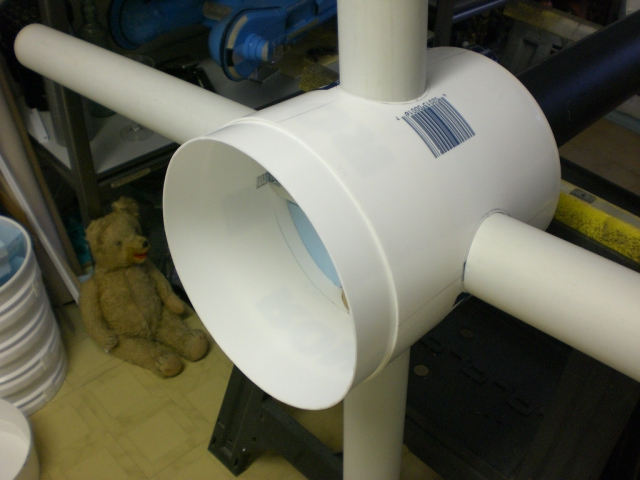
Braces around the main tube connecting the 2 modules and inside blue foam to brace the spokes.
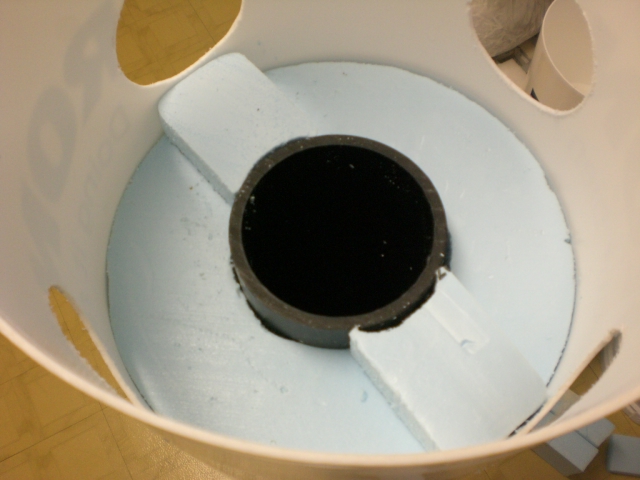
Inside with the 4 spokes in place
And the final comp with modules, spoke and main tube.
 |
|
| Back to top |
|
|
|
|
|
|
|
|
|
|
|
| Author |
Message |
Ki-Djowac
Community Member
Joined: 23 Feb 2012
Posts: 164
Location: Belgium
|
| Posted: Sun Apr 13, 2014 1:37 am Post subject: |
|
|
Awesome ! 
I couldn't help but notice the Millenium Falcon, AT-AT walker, sand crawler looking vehicle and R2-D2 in the background. Nice collection !! 
_________________
 |
|
| Back to top |
|
|
|
|
|
|
|
|
|
|
|
| Author |
Message |
Bwood
Community Member
Joined: 20 Sep 2009
Posts: 843
|
|
| Back to top |
|
|
|
|
|
|
|
|
|
|
|
| Author |
Message |
8th_Passenger
Community Member
Joined: 28 Nov 2009
Posts: 443
Location: Hertfordshire, UK
|
| Posted: Sun Apr 13, 2014 12:36 pm Post subject: |
|
|
That is one huge model joberg.
I can see how your wife may disapprove!
But I take it there is no turning back now?
Do you think your initial structure will support the rest. Or will you need to add extra reinforcement?
Looks like you just have room for the build.
Colin |
|
| Back to top |
|
|
|
|
|
|
|
|
|
|
|
| Author |
Message |
joberg
Community Member
Joined: 06 Oct 2008
Posts: 9447
|
| Posted: Sun Apr 13, 2014 5:54 pm Post subject: |
|
|
Thanks Bwood but I already had that one  And yes Colin, there's no turning back. And yes Colin, there's no turning back.
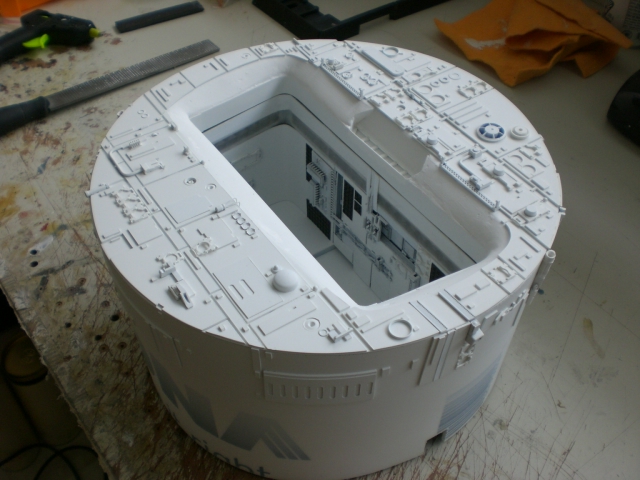
Here's the add-on to the module; it's going to be the landing bay and I'll be able to remove just that piece to have access to the battery.
And the face of the landing bay...not easy that design around the bay itself
 |
|
| Back to top |
|
|
|
|
|
|
|
|
|
|
|
| Author |
Message |
8th_Passenger
Community Member
Joined: 28 Nov 2009
Posts: 443
Location: Hertfordshire, UK
|
| Posted: Fri Apr 18, 2014 2:54 pm Post subject: |
|
|
Joberg,
I'm still amazed at the size of this model. Just wondering if it was a commission, or for yourself? Why the imposed budget? Not that I'm suggesting you should go over budget. Will there be a shuttle to go with it?
Colin |
|
| Back to top |
|
|
|
|
|
|
|
|
|
|
|
| Author |
Message |
joberg
Community Member
Joined: 06 Oct 2008
Posts: 9447
|
| Posted: Sun Apr 20, 2014 4:22 pm Post subject: |
|
|
Colin, no commission, just to show the wife how crazy I can be (besides the challenges ).
Here's the landing bay interior with the lighting test (I'll have to put the light strip closer to the top and bottom openings.
 .jpg" border="0" /> .jpg" border="0" />
.jpg)
.jpg)
Next is dressing the face and sides of the removable piece
.jpg) |
|
| Back to top |
|
|
|
|
|
|
|
|
|
|
|
| Author |
Message |
Gaff87
Community Member
Joined: 05 Oct 2008
Posts: 1727
Location: United Kingdom
|
| Posted: Mon Apr 21, 2014 2:41 pm Post subject: |
|
|
Looking great J!!
Neil |
|
| Back to top |
|
|
|
|
|
|
|
|
|
|
|
| Author |
Message |
joberg
Community Member
Joined: 06 Oct 2008
Posts: 9447
|
| Posted: Mon Apr 21, 2014 4:01 pm Post subject: |
|
|
Thanks Neil...here's another set: greeblies on the face of the landing bay and sides, painting and voilà!
.jpg)
.jpg)
 [/img] [/img] |
|
| Back to top |
|
|
|
|
|
|
|
|
|
|
|
| Author |
Message |
Ki-Djowac
Community Member
Joined: 23 Feb 2012
Posts: 164
Location: Belgium
|
| Posted: Mon Apr 21, 2014 4:36 pm Post subject: |
|
|
Very cool, this is going to look amazing when completed !
_________________
|
|
| Back to top |
|
|
|
|
|
|
|
|
|
|
|
| Author |
Message |
joberg
Community Member
Joined: 06 Oct 2008
Posts: 9447
|
| Posted: Tue Apr 22, 2014 6:10 pm Post subject: |
|
|
Thanks Ki...here's some more, since it seems that people here love to see pics (who new )
.jpg)
.jpg)
 |
|
| Back to top |
|
|
|
|
|
|
|
|
|
|
|
| Author |
Message |
joberg
Community Member
Joined: 06 Oct 2008
Posts: 9447
|
| Posted: Wed Apr 23, 2014 6:37 pm Post subject: |
|
|
Well, here's another beauty shot and after that I'll return to my second landing bay for the second module.
.jpg) |
|
| Back to top |
|
|
|
|
|
|
|
|
|
|
|
| Author |
Message |
Ki-Djowac
Community Member
Joined: 23 Feb 2012
Posts: 164
Location: Belgium
|
| Posted: Thu Apr 24, 2014 12:11 am Post subject: |
|
|
This is coming along nicely. Like the detailing and lighting alot. Very cool
_________________
|
|
| Back to top |
|
|
|
|
|
|
|
|
|
|
|
|
You cannot post new topics in this forum
You cannot reply to topics in this forum
You cannot edit your posts in this forum
You cannot delete your posts in this forum
You cannot vote in polls in this forum
|
|
|
|
|
|
|
|