 |
 |
 |
 |
 |
| Author |
Message |
Praxis_Effect
Community Member
Joined: 02 Aug 2015
Posts: 21
Location: Canada
|
 Posted: Tue Aug 04, 2015 11:40 pm Post subject: Narcissus by Halcyon - Cockpit Build Up Posted: Tue Aug 04, 2015 11:40 pm Post subject: Narcissus by Halcyon - Cockpit Build Up |
 |
|
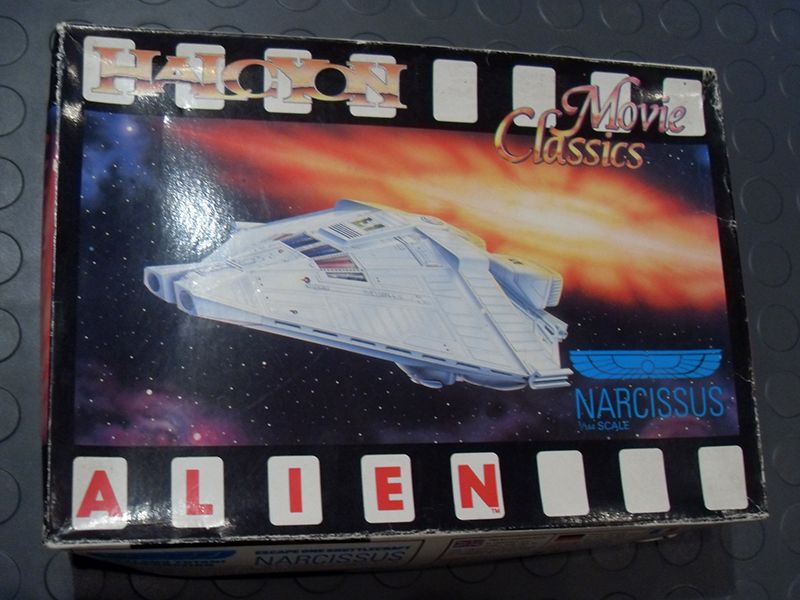
Alien has become such a classic movie. What better excuse to bring out the model kits.
Especially Halcyon’s rendition of the Narcissus. Here, I’m going to make a cockpit for the kit.
If you’re handy, it’s probably something that you could make over the course of a few weekends.
I haven’t seen too many attempts at this documented on the web.
It’s on, boy-o’s!!
Some complain about the kit a handful of inaccuracies.
However, I think that Halcyon et al did a great job on the kit; given the era, and the amount of reference material available at the time.
I recall seeing this kit decades ago in the local hobby shop; my brother and I used to drool over it, sitting there in the glass case.
I’m pretty sure that the price on it was in excess of an astounding 200 dollars CDN at the time. I’m sure that the owner jacked up the price.
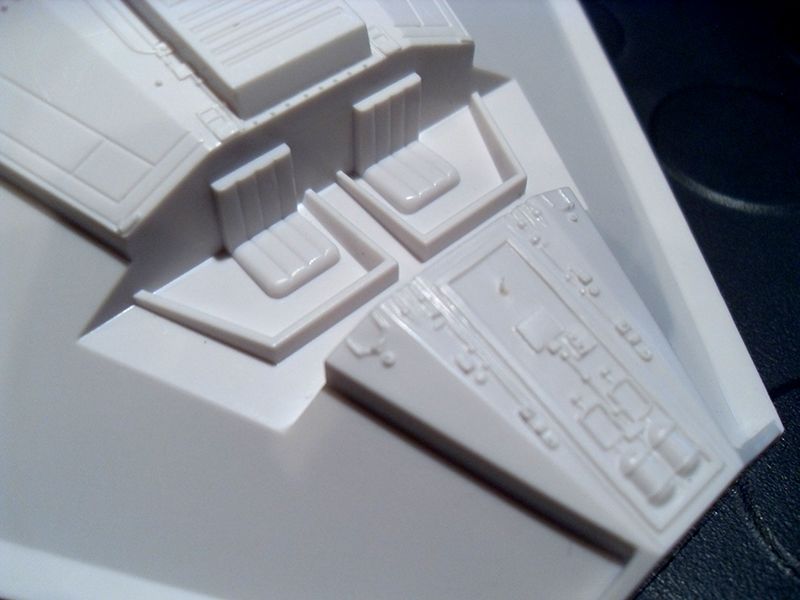
Let’s dig right in and remove the original cockpit; note that an upper alignment pin will be removed with it.
I did it with a utility knife, and I had to go slow. The plastic is really thick, and you’ll probably have to remove slivers of plastic from the kerf that you’re making.
Work from the underside when possible. Wear gloves in case you slip.
Be especially careful near the top rear of the cockpit. Any mistakes there will be easily seen.
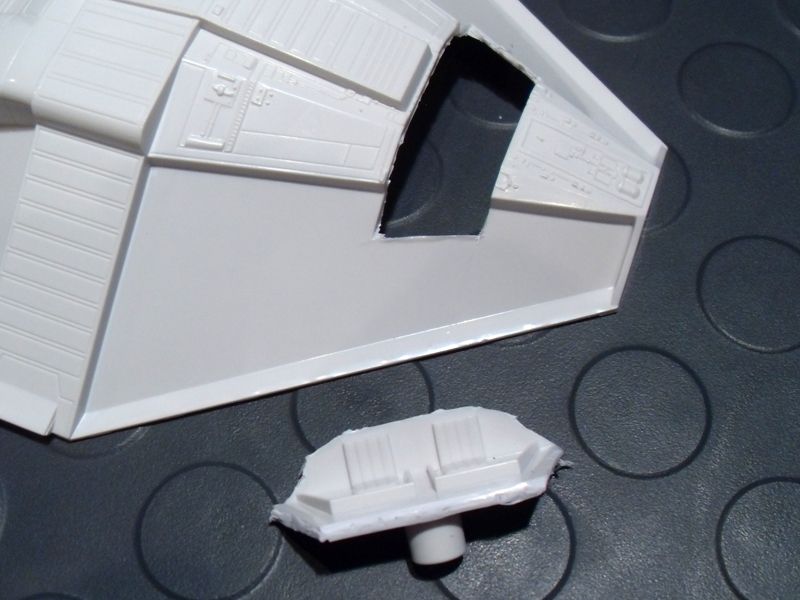
RRRRipp...! ok..!
At this point, the scale of the kit has to be dealt with. Halcyon’s packaging states that it’s 1/144 scale.
Simple logic shows that to be incorrect. The actual ship (as shown in the movie) simply isn’t that big.
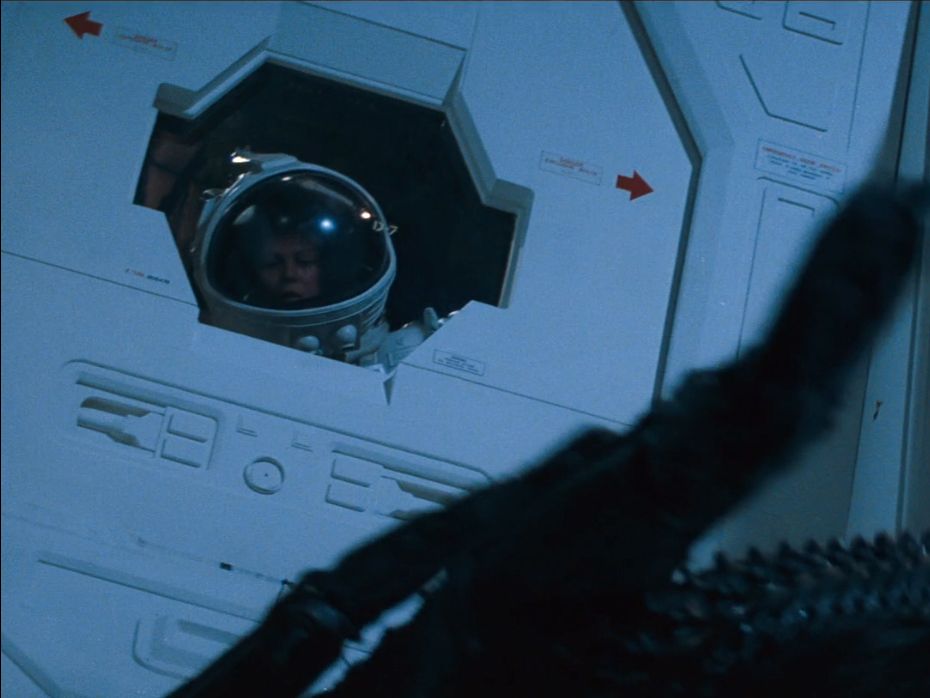
From the shot of Ripley peering out of the airlock window on the rear of vessel, I figure that the scale is closer to 1/75, given that the average human head is 9 inches tall.
You can see from the photo that the height from the “floor” to the top of the cockpit is about 2.8 cm. That works out to roughly 75 * 2.7 cm = 203 cm = 6 feet, 8 inches of headroom.
It’s reasonable to assume that a full-grown adult could stand up there, even while wearing a helmet.
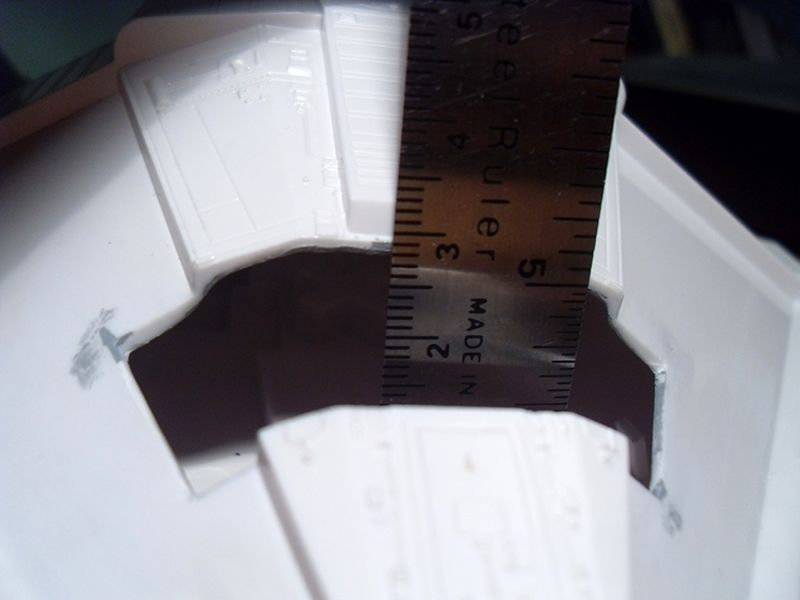
Next up... seats..!
Fun, fun, fun..! |
|
| Back to top |
|
 |
|
 |
 |
 |
 |
 |
 |
 |
 |
| Author |
Message |
joberg
Community Member
.jpg)
Joined: 06 Oct 2008
Posts: 9447
|
 Posted: Wed Aug 05, 2015 8:01 am Post subject: Posted: Wed Aug 05, 2015 8:01 am Post subject: |
 |
|
Good luck on the transfo Praxis_Effect. Right you are about the kit...btw, on the RPF, the Narcissus friends have built an accurate model (down to that famous cockpit)  |
|
| Back to top |
|
 |
|
 |
 |
 |
 |
 |
 |
 |
 |
| Author |
Message |
Praxis_Effect
Community Member

Joined: 02 Aug 2015
Posts: 21
Location: Canada
|
 Posted: Wed Aug 05, 2015 1:23 pm Post subject: Posted: Wed Aug 05, 2015 1:23 pm Post subject: |
 |
|
Thanks for the info... that's expert-level work. Maybe even better.
As usual, the major issue with movie spacecraft is that the interior sets don't match or fit into what the model of the vessel represents.
As shown in the RPF thread, the (film unused) studio model interior represented a much smaller vessel.
That is, the seats are bolted to the floor, and the pilots can sit in them and actually see out of the windscreen, as shown below.
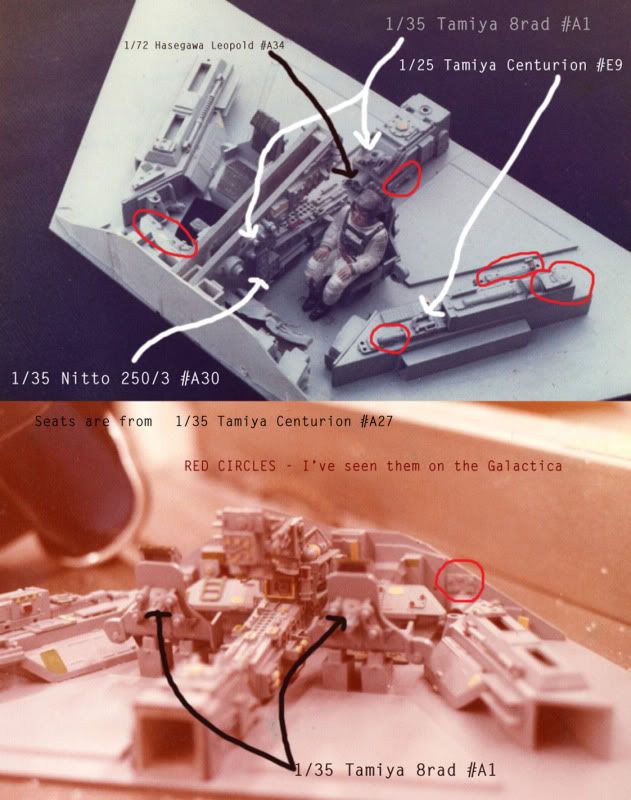
For the movie, it seems that a decision was made to that the Narcissus was in fact, a much larger vessel.
It probably occurred when it was decided that the end-game scene would take place on board.
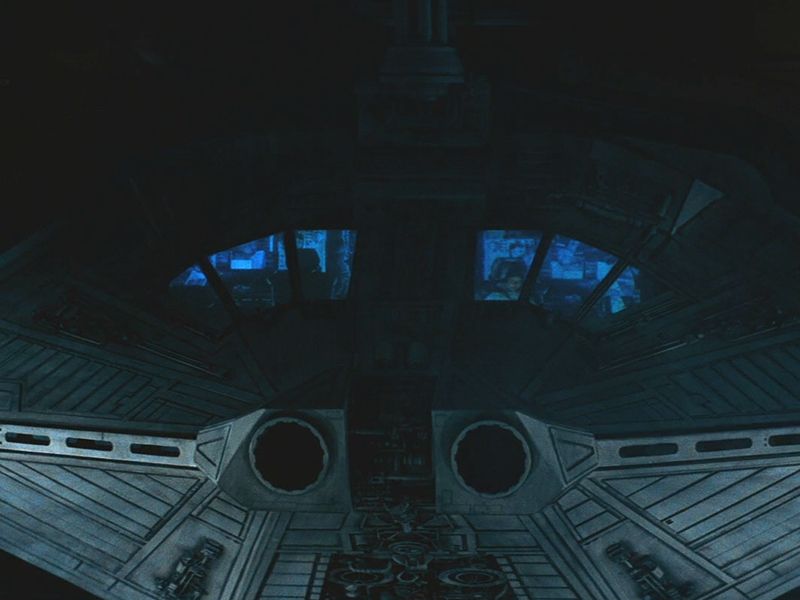
As the ship in the movie is obviously bigger, a problem is presented. Seats at that scale bolted the "floor" will be too low for seated pilots to see out the windscreen.
You can see in the below movie shots how small a person is in relation to the ship.
The life-size studio sets prepared for the scene wherein Dallas relaxes aboard the Narcissus are different yet again.
The angle of the windscreen is very shallow, also bringing the seats much closer to the front, while also bringing the control panel forward.
Outside shots indicate a spacious, cavernous vessel, and yet interior cockpit shots show a cramped space.
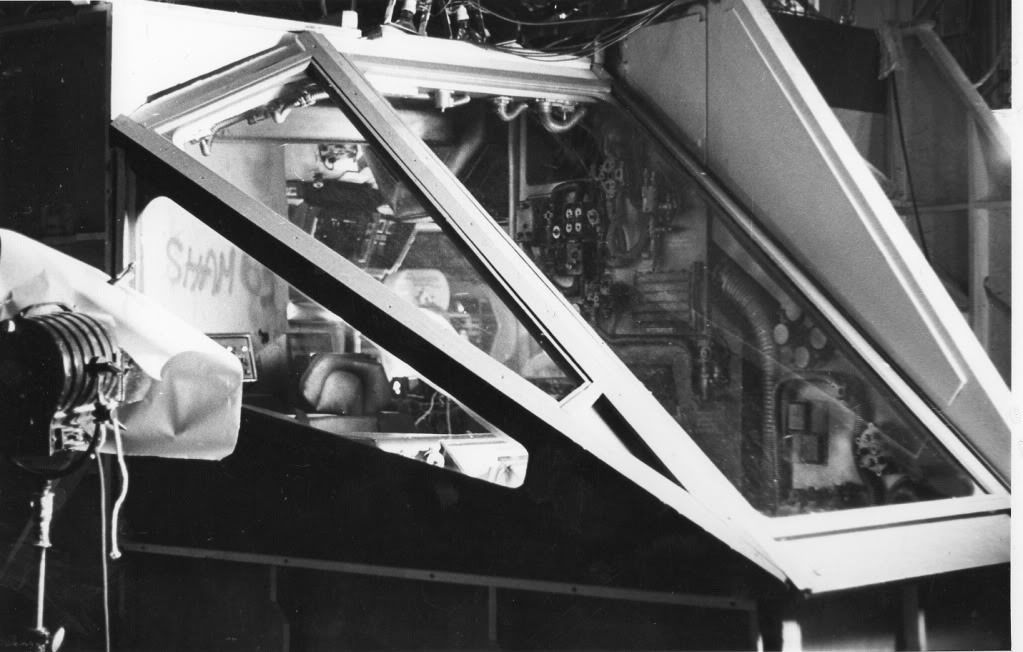
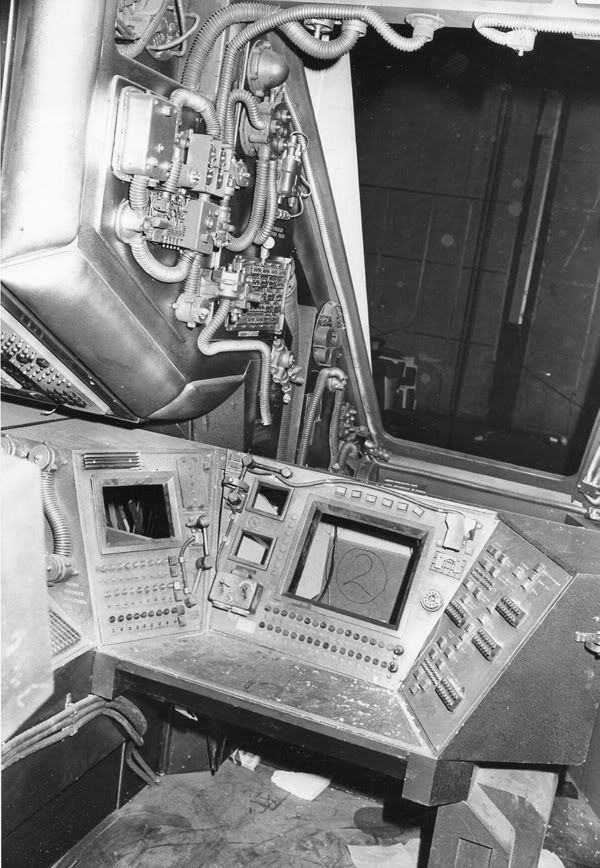
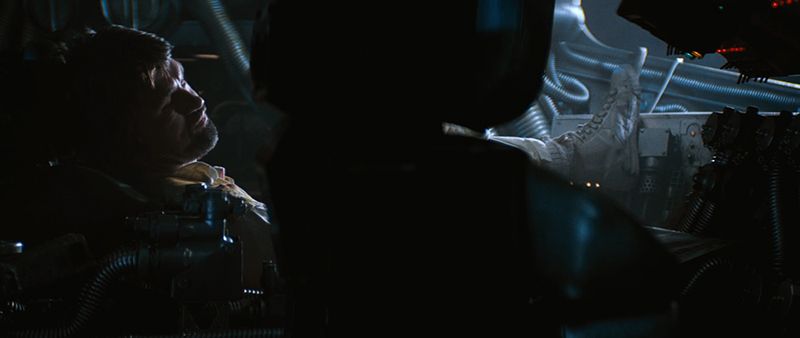
My goals are to use the scale of the ship as shown in exterior film shots, and yet make a space that would actually be functional given the scale.
My solution will to make a raised "flight deck" on which the seats will be placed. It seems that Halcyon was already onto this concept. |
|
| Back to top |
|
 |
|
 |
 |
 |
 |
 |
 |
 |
 |
| Author |
Message |
Praxis_Effect
Community Member

Joined: 02 Aug 2015
Posts: 21
Location: Canada
|
 Posted: Wed Aug 05, 2015 1:30 pm Post subject: Posted: Wed Aug 05, 2015 1:30 pm Post subject: |
 |
|
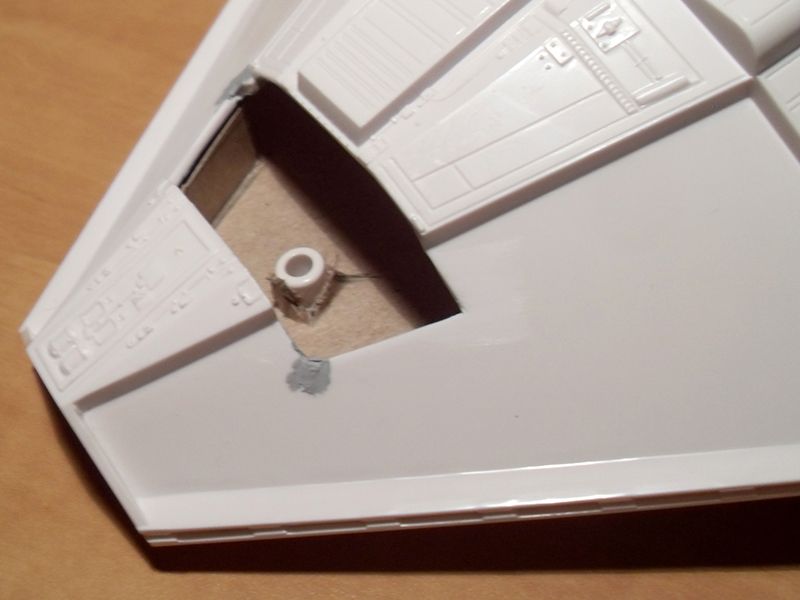
Here, I've made a simple cardboard pattern consisting of a "subfloor", and a cup-shaped "room".
It's open at the back; presumably so that the pilots can gain ingress that way. Once the fit is perfect, I'll make similar parts out of styrene.
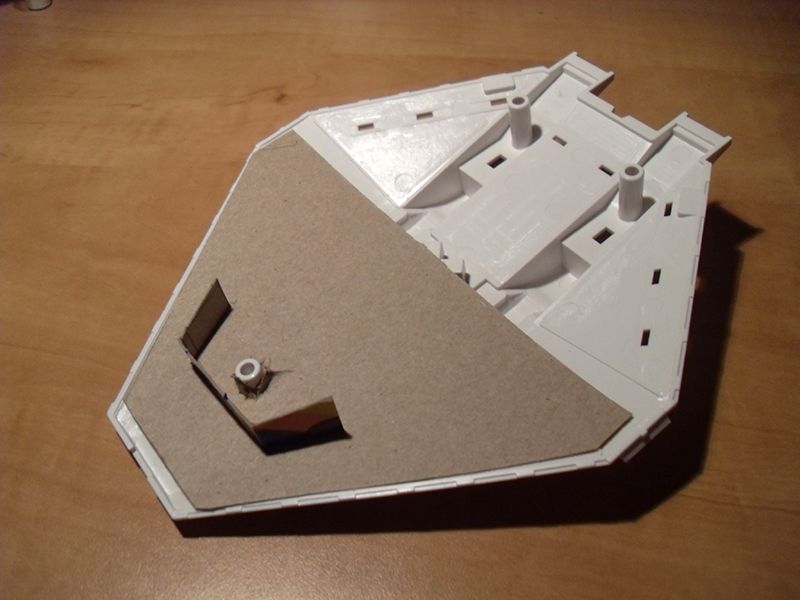
 |
|
| Back to top |
|
 |
|
 |
 |
 |
 |
 |
 |
 |
 |
| Author |
Message |
Praxis_Effect
Community Member

Joined: 02 Aug 2015
Posts: 21
Location: Canada
|
 Posted: Wed Aug 05, 2015 2:19 pm Post subject: Posted: Wed Aug 05, 2015 2:19 pm Post subject: |
 |
|
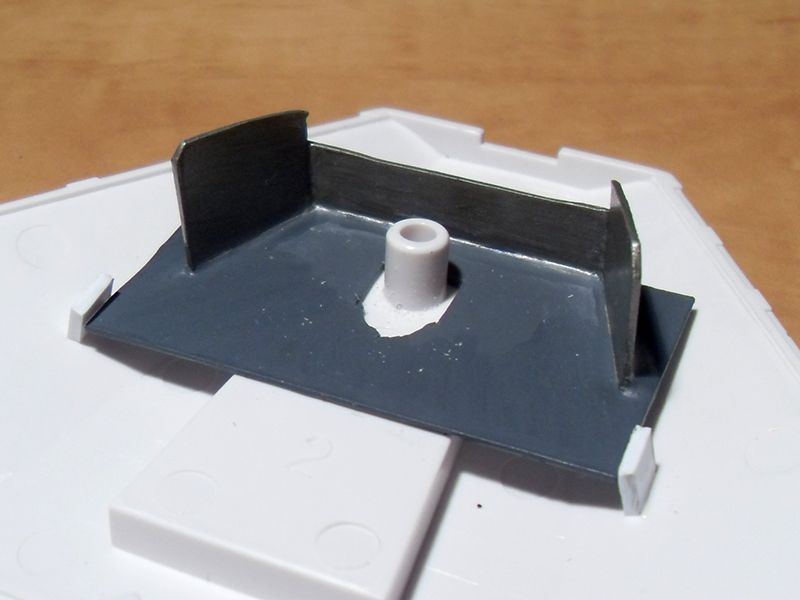
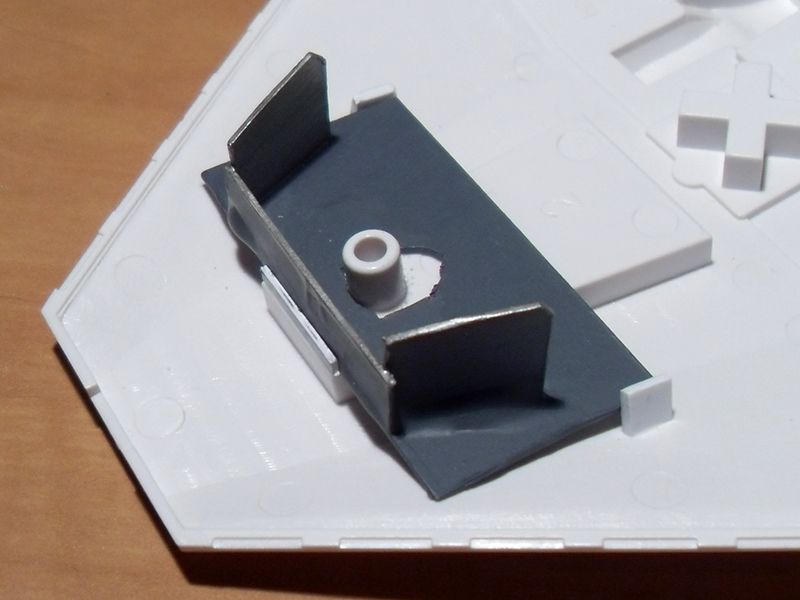
Next, I transferred my pattern/measurements onto .030 styrene sheet. Glue it up with your favorite glue for styrene models.
I used the glue to tack it, once that dried, I put fillets of epoxy on the outer seams to strengthen the assembly.
The remaining alignment pin courtesy of Halcyon centers the assembly. I then glued three tabs as shown (a small strip in front, and one to the left and right).
This holds the cockpit assembly to the chassis, and the assembly can be snapped in and out as needed.
Note that there's already some primer and paint on this.
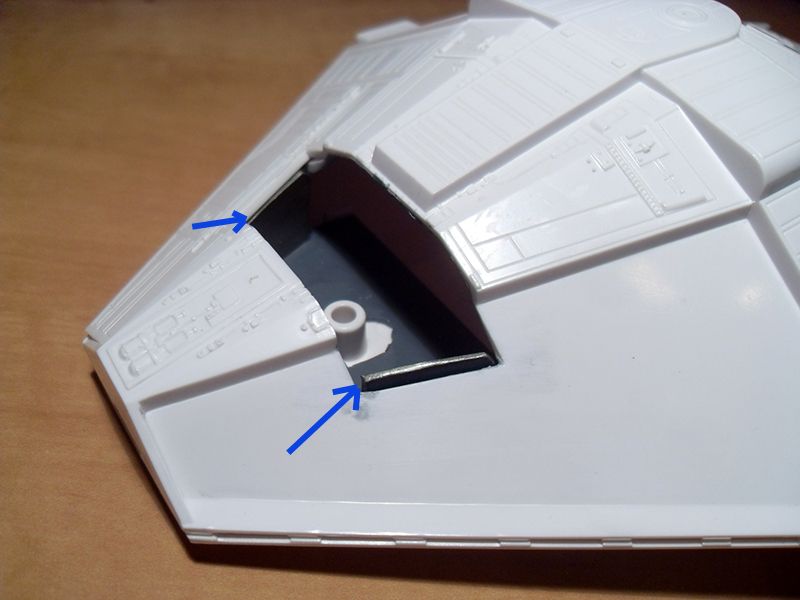
Let's test the fit, and the look. The Halcyon kit provides two large detailed panels that fit on the left and right nose of the craft. Note how I've made the left and right walls of the cockpit a bit higher than the chassis of the craft in order to meet these panels (see blue arrows). The far side of the craft has this panel in place, the near side does not in the photo. This isn't really necessary... you probably won't ever notice the difference once the windscreen is in place.
 |
|
| Back to top |
|
 |
|
 |
 |
 |
 |
 |
 |
 |
 |
| Author |
Message |
joberg
Community Member
.jpg)
Joined: 06 Oct 2008
Posts: 9447
|
 Posted: Thu Aug 06, 2015 9:30 am Post subject: Posted: Thu Aug 06, 2015 9:30 am Post subject: |
 |
|
Of course, you gotta be careful with trying to cram set into model or vice-versa. It seldom works in the real world and that's how movie are made anyway  |
|
| Back to top |
|
 |
|
 |
 |
 |
 |
 |
 |
 |
 |
| Author |
Message |
Praxis_Effect
Community Member

Joined: 02 Aug 2015
Posts: 21
Location: Canada
|
 Posted: Thu Aug 06, 2015 1:13 pm Post subject: Posted: Thu Aug 06, 2015 1:13 pm Post subject: |
 |
|
Yes, you're right. ...and a tip of the hat to those that manage to pull it off convincingly..! I'll try and make something having the "alien" aesthetic.
But, it won't be completely accurate. Something fun.
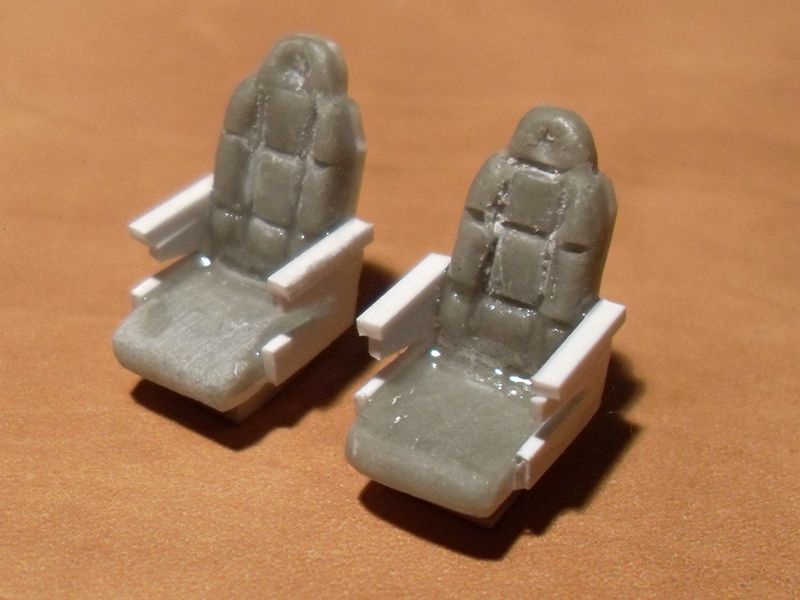
Here's the build-up of the seats. I measured my office chair, and I added the headrest… scaled down, of course.
I've ensured that the seat back is a bit tall, and that the seats will sit close to the floor, as in the "Nostromo" style.
I cut the parts from .030" styrene once again. Note that the seat cushion is wider than the back.
I thought that they should be wider so that the armrests could be glued on top of the cushions.
I later made these cushions the same width as the back. Be sure to round the corners of the cushion parts a little.
The photo (below, left) shows the styrene parts for two seats. Seat backs are at the top, then the cushions, and then the parts for the base.
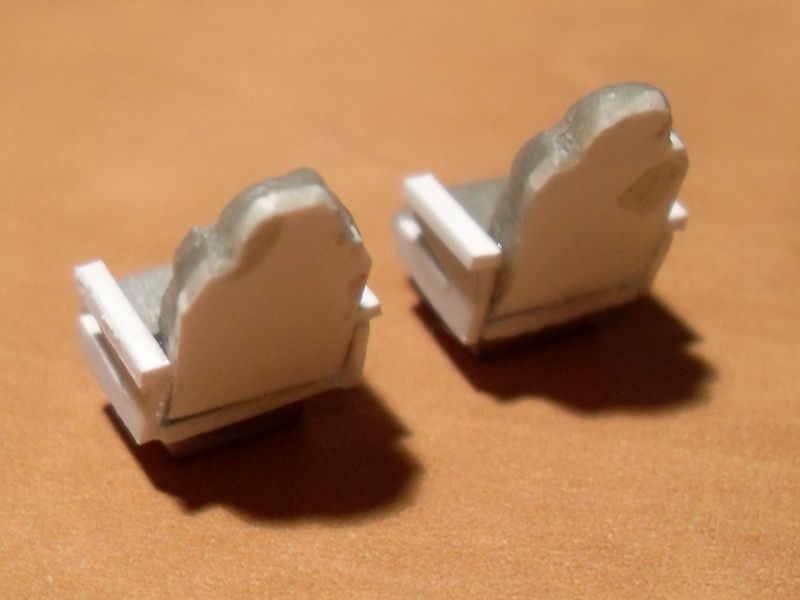
Each base consists of two parts glued on top of each other to give the seat enough height off the floor.
One piece is .030" and the other is .060" thickness giving a total height of .090" for the base.
In the center photo, you can see that I've put some Apoxie sculpt onto the seat backs, and the cushions.
While the Apoxie sculpt is still soft, use a hobby knife with a #11 blade to make the cushion pattern in the seat backs.
Dampen the knife so that the Apoxie sculpt doesn't stick to the knife, and press it in.
The photo on the right shows the finished cushions, with the bases glued on (underneath the seat cushions), and also the armrests that I made (also .030 styrene).

Here is a photo of the seat parts all glued together. I also added some armrest pads made of tiny styrene strips.
At this stage, they're still a bit rough. If need you need to build up some areas, use some model filler such as Tamiya putty.
To smooth things out a bit, use very fine wet/dry sandpaper... consider using 600 to 1000 grit. At this tiny size, removing a lot of material quickly is not recommended.
If you have God-mode modelling skills, your seats may need very little clean up... haha...
 |
|
| Back to top |
|
 |
|
 |
 |
 |
 |
 |
 |
 |
 |
| Author |
Message |
Praxis_Effect
Community Member

Joined: 02 Aug 2015
Posts: 21
Location: Canada
|
 Posted: Thu Aug 06, 2015 1:57 pm Post subject: Posted: Thu Aug 06, 2015 1:57 pm Post subject: |
 |
|
Here are the finished seats. Two can fit on a penny... haha...
I put some Tamiya putty onto the armrests to make an end cap (see the blue arrow)... to make it look more finished.
Carve it to make the correct shape when the putty is dry.
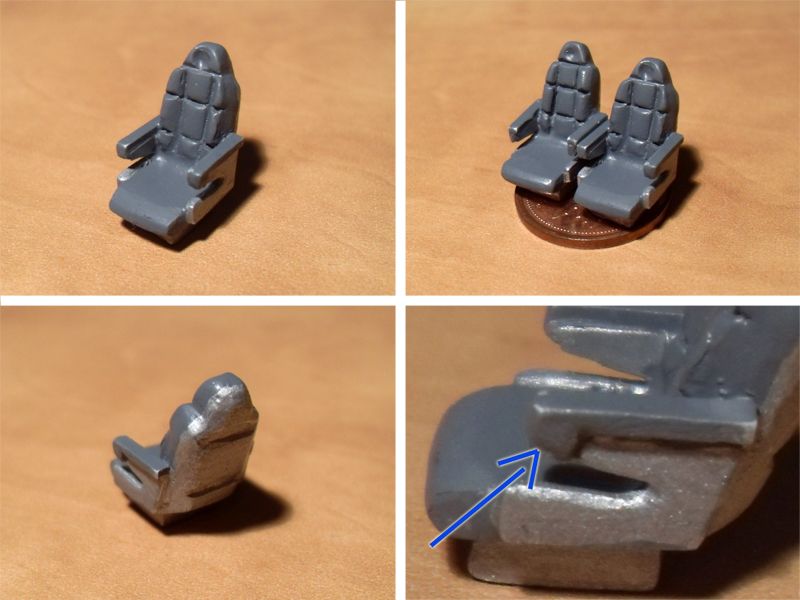
I like the shape of the seats. If you wish to make your seats even more "Nostromo"-like, make the shoulders of the seat backs a bit more square, and add bulkier shoulder bolsters.
Next, make the cushions on the seat make a bit more "flat". Perhaps, let the Apoxie sculpt dry first, then make shallow cuts to indicate the cushioning of the seat backs. |
|
| Back to top |
|
 |
|
 |
 |
 |
 |
 |
 |
 |
 |
| Author |
Message |
joberg
Community Member
.jpg)
Joined: 06 Oct 2008
Posts: 9447
|
 Posted: Fri Aug 07, 2015 9:14 am Post subject: Posted: Fri Aug 07, 2015 9:14 am Post subject: |
 |
|
Those seats are surely good enough for the detailing you want to achieve  |
|
| Back to top |
|
 |
|
 |
 |
 |
 |
 |
 |
 |
 |
| Author |
Message |
Praxis_Effect
Community Member

Joined: 02 Aug 2015
Posts: 21
Location: Canada
|
 Posted: Fri Aug 07, 2015 1:02 pm Post subject: Posted: Fri Aug 07, 2015 1:02 pm Post subject: |
 |
|
Your encouragement is much appreciated, joberg, thanks!
The real-life parts actually look better than the photos. The bright light, and close-ups are akin to looking at the parts under magnification… haha…
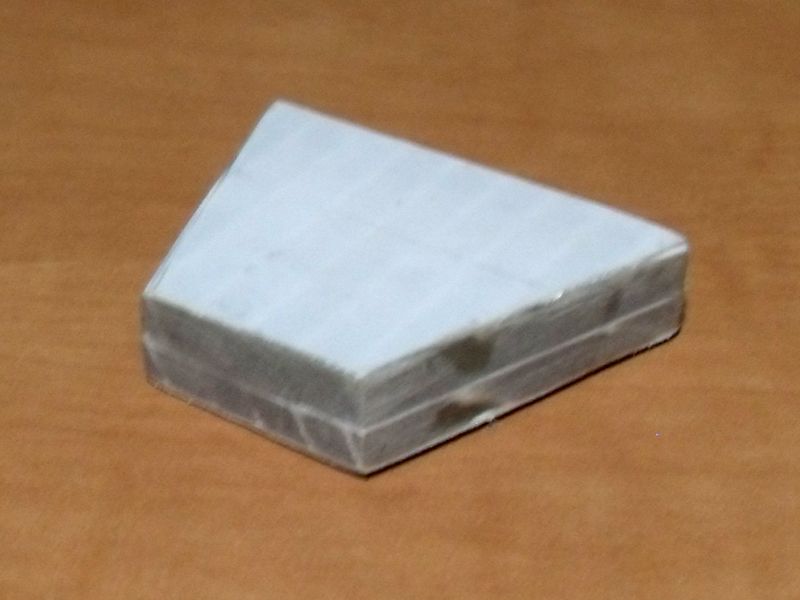
Here’s how I made a little “flight deck”. I cut two identical trapezoidal shapes out of corrugated plastic.
Next, I epoxied the two pieces on top of each other, and then made a hole in the bottom to accept the alignment pin of the model.
I made it solid by filling all the voids with Apoxie Sculpt as shown in the photo below.
Once that dried, I filled any voids again, I let that dry, and then it was primed and sanded.
Some artifacts of the corrugated core were evident, so I coated the sides with Tamiya putty, and then wet-sanded that.
This assembly turned out to be slightly tall for my needs, so I sanded about 1 mm (1/32”) off the underside.
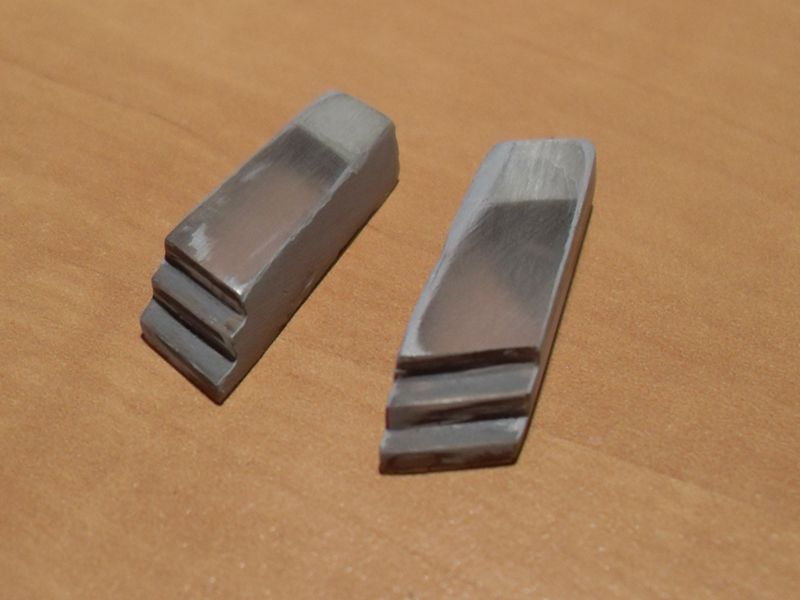
I made little staircases to go on either side of the fight deck out three stacked layers of 2mm (5/64) Plexiglas (Perspex).
I used this because it’s what I had on-hand… but it’s very hard and difficult to work with.
I cut the parts with a Dremel cut-off wheel, glued the layers together, and then filed it with a diamond file. Fill any imperfections with Tamiya putty, and wet-sand.
Originally, these parts were intended to be installed far enough forward into the cockpit, so that they could be seen.
However, in order to be functional in a real-world setting, they’d have to be longer and set farther back; you can see where I added some length with Apoxie Sculpt (below).
An observer probably wouldn’t be able to see the stair details in the final model. As such they could be omitted, or simple “ramps” could be made to save some effort.
Let’s test the fit of the parts. Looks good. I took these photos before I lengthened the stair assemblies, by the way.
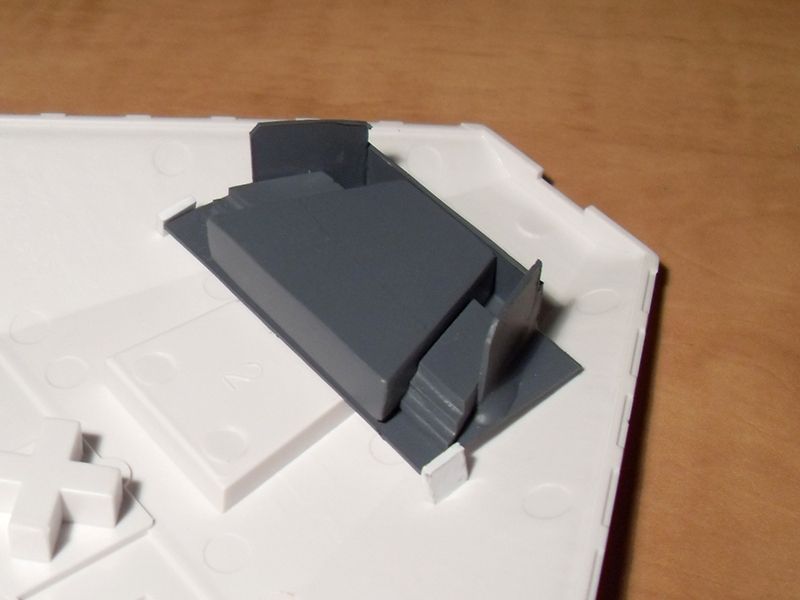
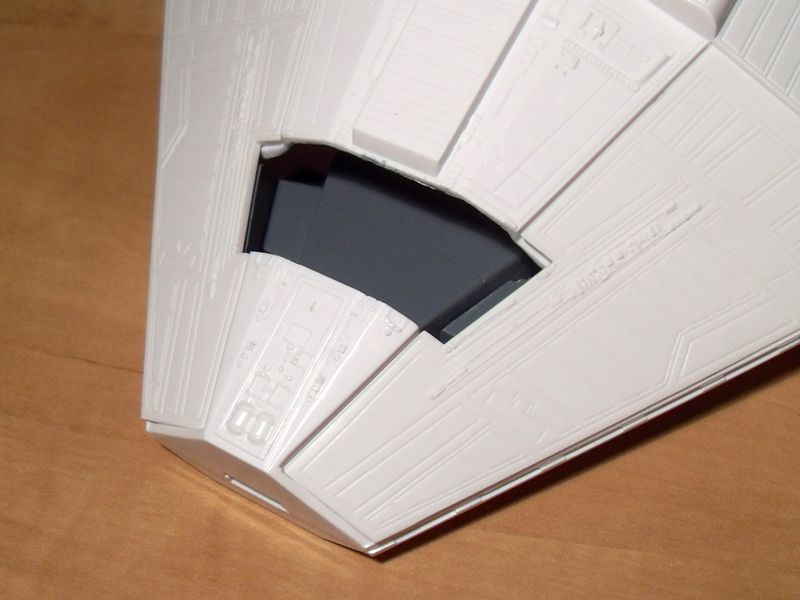
Some details need to be created behind the seats. I don’t intend to detail the rear compartment of the vessel…
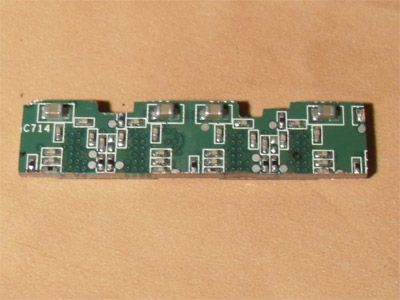
So, I made something interesting that obscures the empty area behind the cockpit. Modern electronics are a great source of greebly-bits.
I my old video card died (it was horrendously expensive back in day, by the way), and I’m going to use a piece of it as shown.
I cut an interesting part of the circuit board out with a Dremel cut-off wheel. Eye and breathing protection are a *must*.
I glued it onto the flight deck, and put two little styrene walls on either side of it.
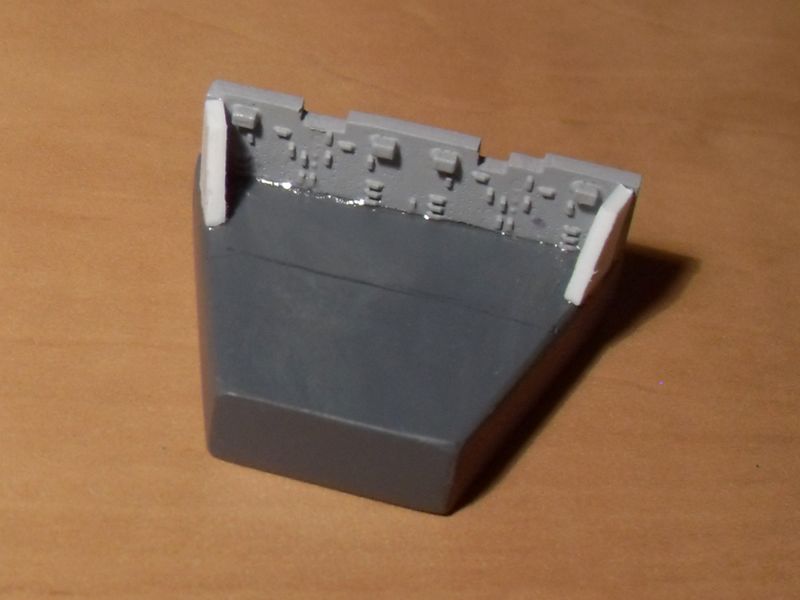 |
|
| Back to top |
|
 |
|
 |
 |
 |
 |
 |
 |
 |
 |
| Author |
Message |
Praxis_Effect
Community Member

Joined: 02 Aug 2015
Posts: 21
Location: Canada
|
 Posted: Sat Aug 08, 2015 6:56 pm Post subject: Posted: Sat Aug 08, 2015 6:56 pm Post subject: |
 |
|
Next, let's make a Nostromo-style flight console.
As shown in the photo below, I made a little "table" with a trapezoidal top... the angles of which mimic the profile of the flight deck.
I put the little legs on it at this point, which was not a good idea. I broke them off several times while working on it... it's best to leave those off until the console is nearly finished.
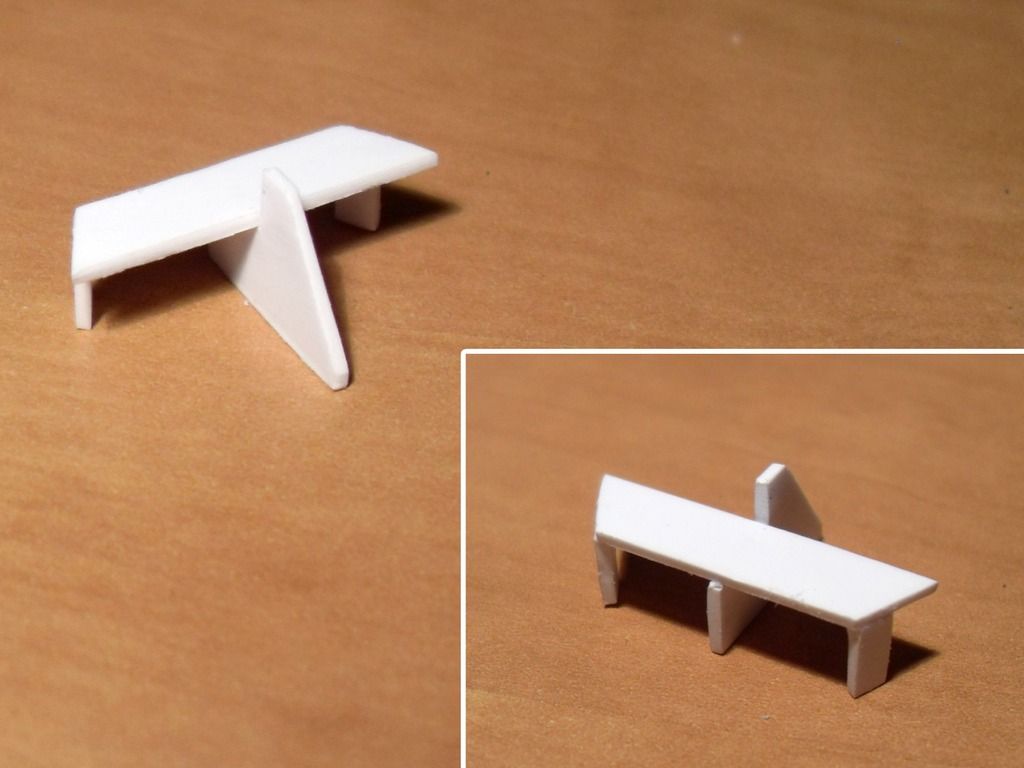
I built up the console using Apoxie Sculpt as shown in fig. 1, below.
You'll probably need a couple of layers to get the shape close to correct.
Then, sand it carefully. Figs.2 and 3 below show the console carved into the correct shape.
This is the "Alien" universe, so angular and blocky styling works well. Correct any mistakes or marks with Tamiya putty, and carefully sand it.
Fig.4 below shows where I added two bits of 1 mm styrene to add interest to the top.

I had to be careful to ensure that the console was tall enough so that the seats can tuck under it a little, and yet short enough so that the windscreen can be installed later on.
More to come shortly..! |
|
| Back to top |
|
 |
|
 |
 |
 |
 |
 |
 |
 |
 |
| Author |
Message |
SSB
Community Member
Joined: 15 Apr 2007
Posts: 175
Location: Florida, USA
|
 Posted: Sat Aug 08, 2015 7:24 pm Post subject: Posted: Sat Aug 08, 2015 7:24 pm Post subject: |
 |
|
Very nice. I love Alien, I like model building, and I like watching both.
Very clever use of the surface mount circuit board as well.
Are you going to add tiny monitors, and keyboards  ? ?
-Mike J. |
|
| Back to top |
|
 |
|
 |
 |
 |
 |
 |
 |
 |
 |
| Author |
Message |
Praxis_Effect
Community Member

Joined: 02 Aug 2015
Posts: 21
Location: Canada
|
 Posted: Sun Aug 09, 2015 1:37 pm Post subject: Posted: Sun Aug 09, 2015 1:37 pm Post subject: |
 |
|
Hi Mike,
Thanks a lot for your comments!
Yes, I plan to add some monitor screens onto the console.
I'll either paint them on, or add some little bits of silvery tape.
I'm going to try and add some keyboards/ controls.
My best bet might to print out some decals, and affix them to thin bits of plastic to represent the keyboards.
It's probably near the practical limit of home printing, so we'll see.
Here's the console all painted up.
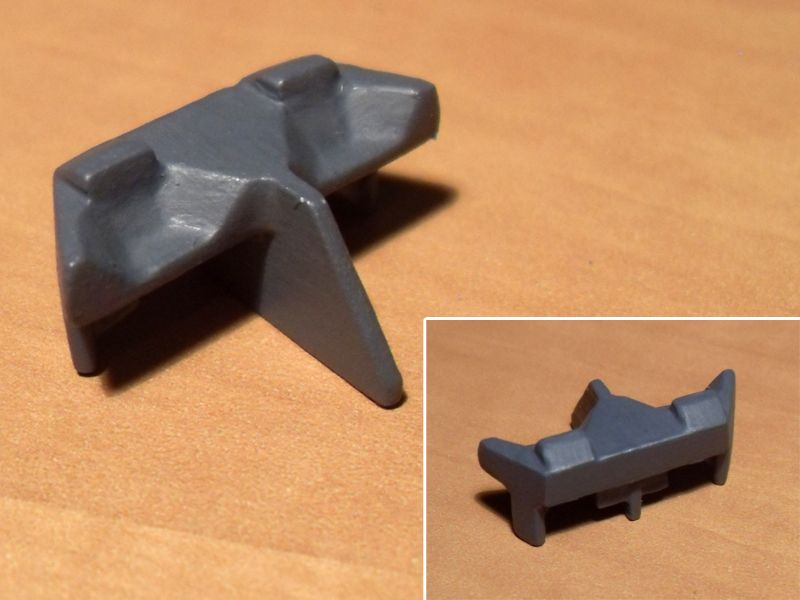
Prior to this, I made a different console.
It has more of a thin, flat-panel style, but I didn't feel that it fit into the universe of the original movie.
Maybe Prometheus, though? haha...
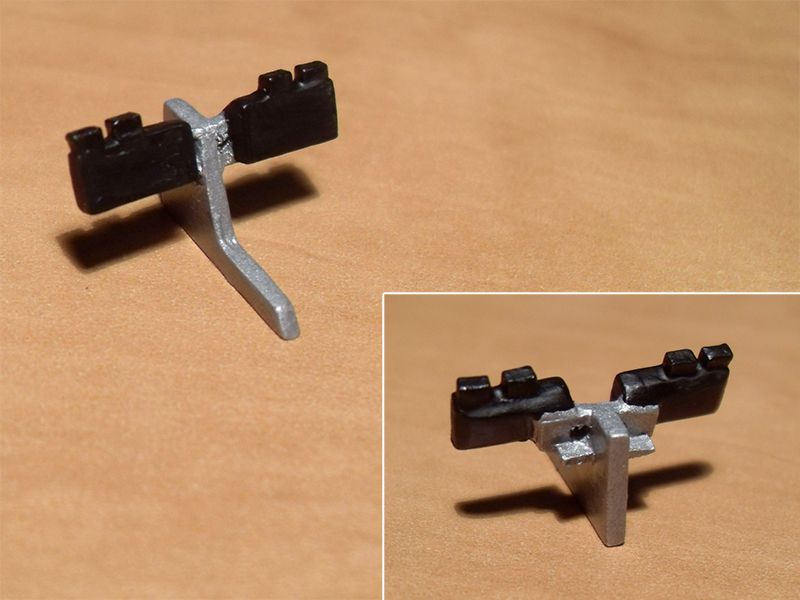 |
|
| Back to top |
|
 |
|
 |
 |
 |
 |
 |
 |
 |
 |
| Author |
Message |
SSB
Community Member
Joined: 15 Apr 2007
Posts: 175
Location: Florida, USA
|
 Posted: Sun Aug 09, 2015 2:08 pm Post subject: Posted: Sun Aug 09, 2015 2:08 pm Post subject: |
 |
|
Dashboard's getting better and better. And I love your mad plan to add monitors and keyboards. Before you're done, you should make the 'windshield' removable, so people can appreciate all your hard work.
Can we get a penny in there or something for scale?
-MJ |
|
| Back to top |
|
 |
|
 |
 |
 |
 |
 |
 |
 |
 |
| Author |
Message |
Praxis_Effect
Community Member

Joined: 02 Aug 2015
Posts: 21
Location: Canada
|
 Posted: Sun Aug 09, 2015 5:43 pm Post subject: Posted: Sun Aug 09, 2015 5:43 pm Post subject: |
 |
|
Having a removable windshield is actually a great idea. I figured that I'd have to light it, or make a clear non-tinted one to even see inside the cockpit. Thanks.
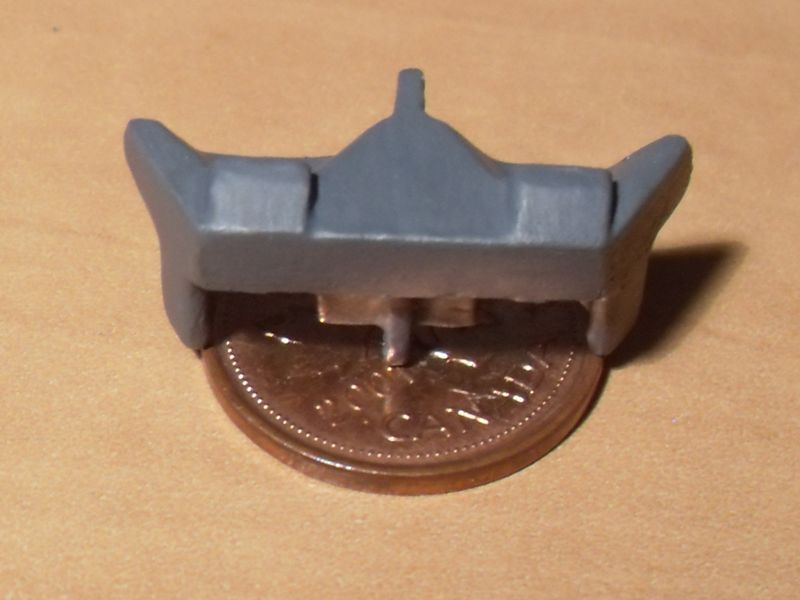
Here's the console on top of a penny. hahaha...
At this tiny scale, a half-inch button in a keyboard would be 1/150 of an inch, or 0.17 mm square... just under the thickness of two pieces of standard paper. I'll have to test print some keyboards, and see how it looks...
 |
|
| Back to top |
|
 |
|
 |
 |
 |
 |
 |
 |
 |
 |
| Author |
Message |
joberg
Community Member
.jpg)
Joined: 06 Oct 2008
Posts: 9447
|
 Posted: Sun Aug 09, 2015 8:17 pm Post subject: Posted: Sun Aug 09, 2015 8:17 pm Post subject: |
 |
|
Good transfo there and the use of circuit board for greeblies is used all the time by yours truly  |
|
| Back to top |
|
 |
|
 |
 |
 |
 |
 |
 |
 |
 |
| Author |
Message |
joberg
Community Member
.jpg)
Joined: 06 Oct 2008
Posts: 9447
|
 Posted: Sun Aug 09, 2015 8:17 pm Post subject: Posted: Sun Aug 09, 2015 8:17 pm Post subject: |
 |
|
Good transfo there and the use of circuit board for greeblies is used all the time by yours truly  |
|
| Back to top |
|
 |
|
 |
 |
 |
 |
 |
 |
 |
 |
| Author |
Message |
Praxis_Effect
Community Member

Joined: 02 Aug 2015
Posts: 21
Location: Canada
|
 Posted: Wed Aug 19, 2015 6:59 pm Post subject: Posted: Wed Aug 19, 2015 6:59 pm Post subject: |
 |
|
"Greebling" is like wine. Nobody knows who invented it.
But, all can enjoy... I wish that we had "spray-on" greebles, though.
(sigh)

I took the time to make some even better seats.
These have quite an "Alien" aesthetic, I think...
They're painted only with primer for now.
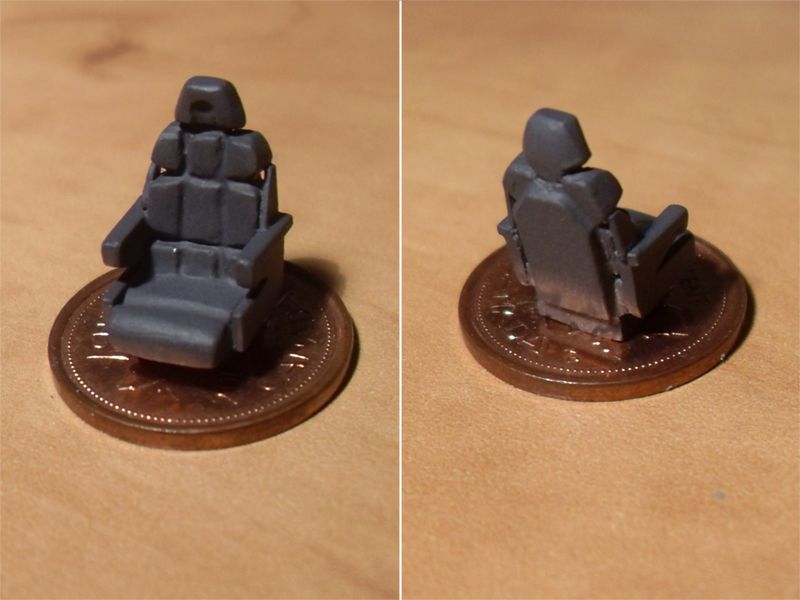
More to come... |
|
| Back to top |
|
 |
|
 |
 |
 |
 |
 |
 |
 |
 |
| Author |
Message |
Praxis_Effect
Community Member

Joined: 02 Aug 2015
Posts: 21
Location: Canada
|
 Posted: Fri Sep 11, 2015 11:13 pm Post subject: Posted: Fri Sep 11, 2015 11:13 pm Post subject: |
 |
|
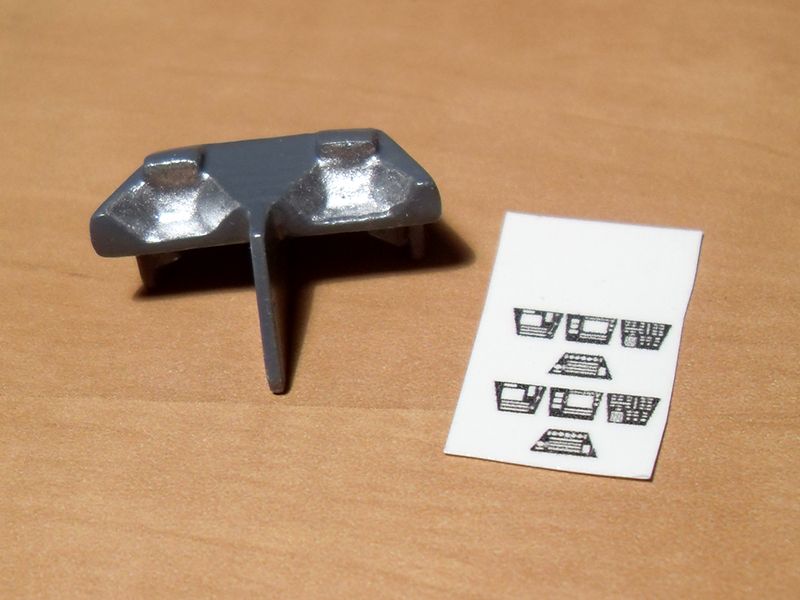
Here I've painted the parts of the control panel where the keyboards, screens and controls will be.
I used Krylon Brilliant Silver, in the spray can, but I used a brush to apply it.
Next, I designed some "control panels" in CorelDraw.
These were printed on Testor's inkjet decal paper.
The details on the panels have to be a bit coarse, as it's difficult even at 300 dpi printing to get clear details.
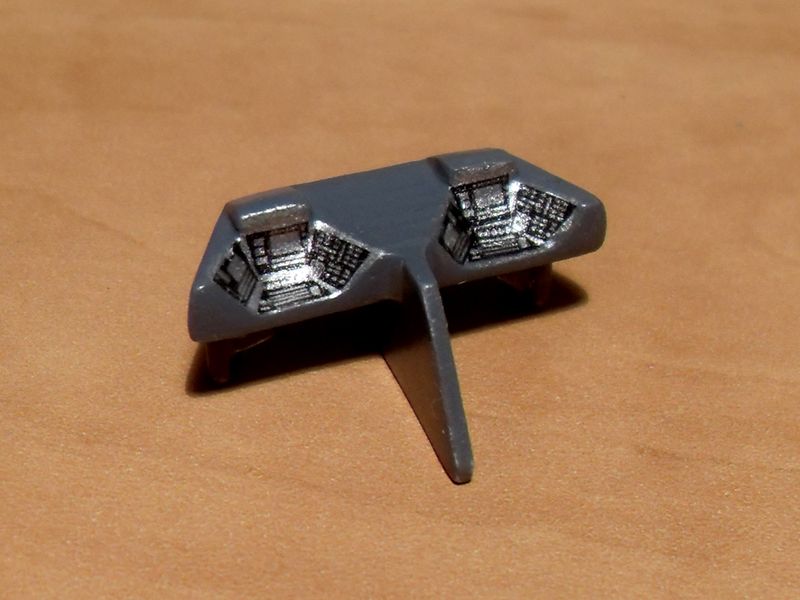
Once applied, the silver paint will show through the clear parts of the decal.
I plan to paint over some of the clear parts with Tamiya's acrylic clear colors.
You could do this for your project, or you could print your colors onto the decals when you create them.
 |
|
| Back to top |
|
 |
|
 |
 |
 |
 |
 |
 |
 |
 |
| Author |
Message |
SSB
Community Member
Joined: 15 Apr 2007
Posts: 175
Location: Florida, USA
|
 Posted: Sat Sep 12, 2015 10:26 am Post subject: Posted: Sat Sep 12, 2015 10:26 am Post subject: |
 |
|
Madness!
Also: nice job  |
|
| Back to top |
|
 |
|
 |
 |
 |
 |
 |
 |
 |
 |
|
You cannot post new topics in this forum
You cannot reply to topics in this forum
You cannot edit your posts in this forum
You cannot delete your posts in this forum
You cannot vote in polls in this forum
|
|
 |
 |
 |
 |
|
 |


